[toc]
SpringCloudAlibaba笔记
SpringCloud,SpringCloudAlibaba是什么?
- SpringCloud是微服务架构下的一站式解决方案。它是一个工具集,集合了一套解决微服务问题的技术。让用户可以直接使用,不需要关心技术整合的问题。
- SpringCloudAlibaba 是阿里巴巴在springcloud的基础上开发的微服务架构一站式解决方案。
springcloud和SpringCloudAlibaba的区别?
| 组件上的区别 | SpringCloud | SpringCloudAlibaba |
|---|---|---|
| 注册中心 | Eureka、Consul | Nacos |
| 配置中心 | SpringCloud Config | Nacos |
| 网关 | SpringCloud Zuul | SpringCloud Gateway |
| 负载均衡 | Ribbon | Loadbalancer |
| 熔断降级 | Hystrix | Sentinel |
| 服务调用 | Feign | OpenFeign |
下图是微服务架构图 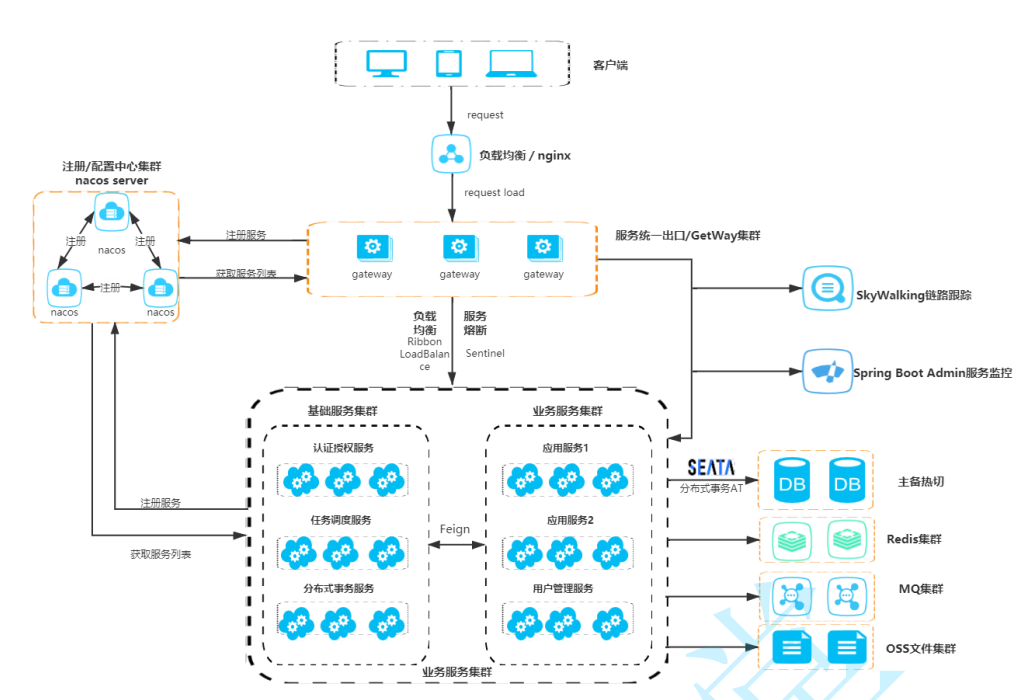
三者依赖版本说明
注意:在搭建微服务框架的时候,要注意SpringCloudAlibaba,SpringCloud,SpringBoot三者的版本,不要各自使用最新的版本。
目前三者之间推荐的版本搭配
| Spring Cloud Alibaba Version | Spring Cloud Version | Spring Boot Version |
|---|---|---|
| 2.2.8.RELEASE | Spring Cloud Hoxton.SR12 | 2.3.12.RELEASE |
目前SpringCloudAlibaba中各个组件的版本搭配
| Spring Cloud Alibaba Version | Sentinel Version | Nacos Version | RocketMQ Version | Dubbo Version | Seata Version |
|---|---|---|---|---|---|
| 2.2.8.RELEASE | 1.8.4 | 2.1.0 | 4.9.3 | ~ | 1.5.1 |
IDEA 搭建 SpringCloudAlibaba 微服务项目
搭建微服务项目,我们使用maven的父子工程来搭建。让maven的父子工程形成继承和聚合的关系。具体参考maven笔记。
1 先创建一个空的maven父工程
① 先创建一个空的maven父工程
由于是空的父工程,可以不使用maven的模板骨架来创建。 
② 删除父工程中不必要的文件和目录,只保留pom.xml和.gitignore文件

为什么让父工程是空的?
父工程的主要作用是为后续的子工程提供Maven依赖的统一管理,起到版本管理器的作用。例如我们可以通过父工程,让各个子工程的maven依赖的版本都是一样。并且我们不需要在父工程中编写代码,因此父工程可以是空的。
③ 修改父工程的pom文件.
完整的父工程pom文件如下
<?xml version="1.0" encoding="UTF-8"?>
<project xmlns="http://maven.apache.org/POM/4.0.0" xmlns:xsi="http://www.w3.org/2001/XMLSchema-instance"
         xsi:schemaLocation="http://maven.apache.org/POM/4.0.0 https://maven.apache.org/xsd/maven-4.0.0.xsd">
    <!--父工程的相关信息-->
    <modelVersion>4.0.0</modelVersion>
    <groupId>com.shuyx</groupId>
    <artifactId>shuyxWebsite</artifactId>
    <version>1.0-SNAPSHOT</version>
    <name>shuyxWebsite</name>
    <description>this is shuyx website system</description>
    <!--父工程的打包方式为pom-->
    <packaging>pom</packaging>

    <!--父工程统一对依赖进行管理,子工程的依赖都用父工程的-->
    <dependencyManagement>
        <dependencies>
            <!-- Spring Boot 版本 -->
            <dependency>
                <groupId>org.springframework.boot</groupId>
                <artifactId>spring-boot-starter-parent</artifactId>
                <version>2.3.12.RELEASE</version>
                <type>pom</type>
                <scope>import</scope>
            </dependency>
            <!-- Spring Cloud 版本 -->
            <dependency>
                <groupId>org.springframework.cloud</groupId>
                <artifactId>spring-cloud-dependencies</artifactId>
                <version>Hoxton.SR12</version>
                <type>pom</type>
                <scope>import</scope>
            </dependency>
            <!-- Spring Cloud Alibaba 版本 -->
            <dependency>
                <groupId>com.alibaba.cloud</groupId>
                <artifactId>spring-cloud-alibaba-dependencies</artifactId>
                <version>2.2.8.RELEASE</version>
                <type>pom</type>
                <scope>import</scope>
            </dependency>
        </dependencies>
    </dependencyManagement>

    <!--使用spring-boot-maven-plugin打包项目,会将项目打包成可执行jar包。-->
    <build>
        <plugins>
            <plugin>
                <groupId>org.springframework.boot</groupId>
                <artifactId>spring-boot-maven-plugin</artifactId>
            </plugin>
        </plugins>
    </build>
</project>
修改要点
- 设置父工程的相关信息
- 修改父工程的打包方式为pom
- 父工程通过dependencyManagement来管理所有子工程的依赖。
- 父工程添加spring-boot-maven-plugin插件来打包项目。
目前三者之间推荐的版本搭配
| Spring Cloud Alibaba Version | Spring Cloud Version | Spring Boot Version |
|---|---|---|
| 2.2.8.RELEASE | Spring Cloud Hoxton.SR12 | 2.3.12.RELEASE |
2 创建子工程
在微服务项目中,一般是根据系统中的服务来拆分出子工程。每个子工程都是一个独立的项目,一个独立的服务。
① 在当前父工程下,创建一个模块。这个模块就是子工程。
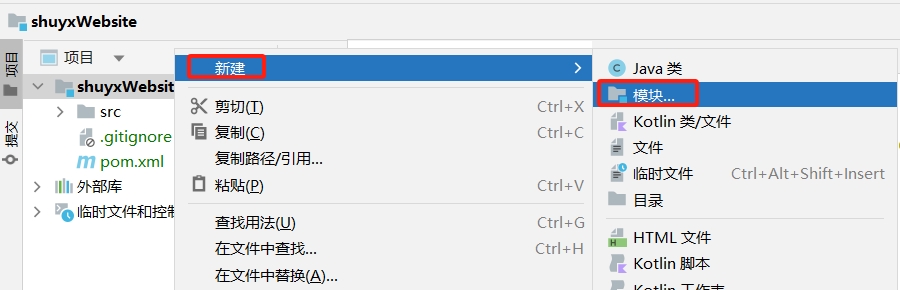
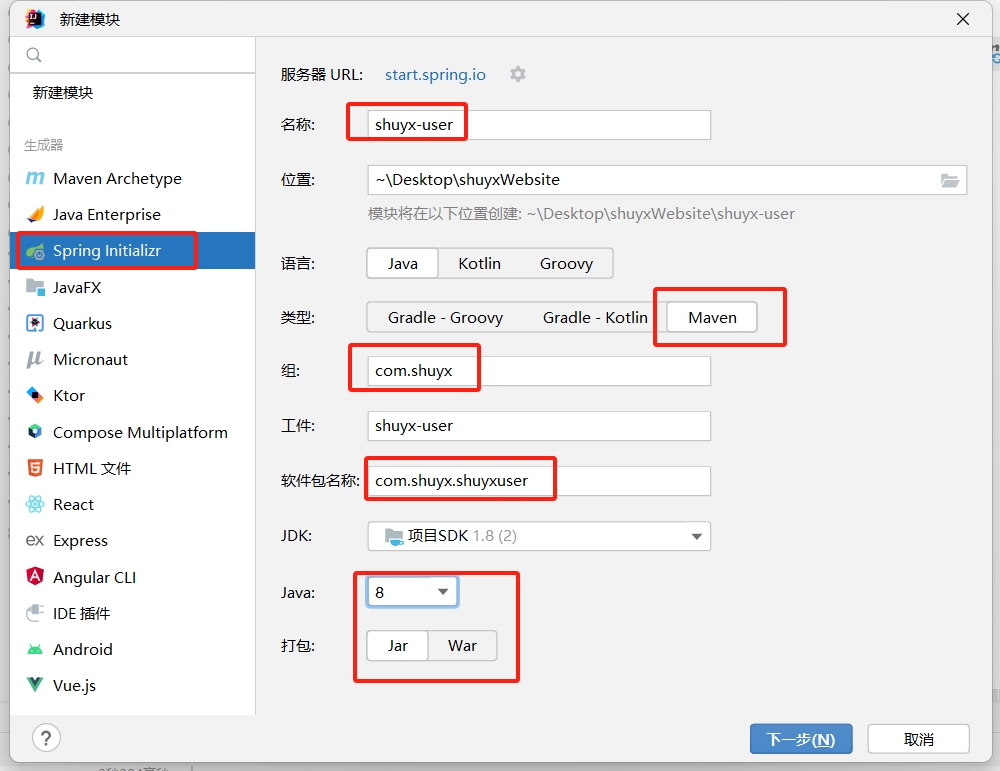
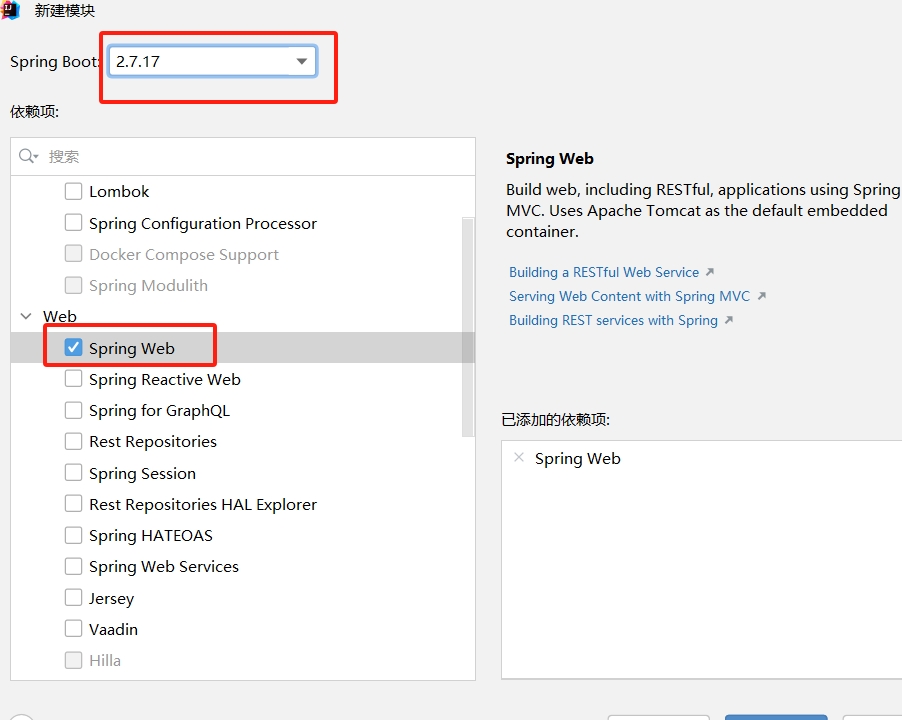
例如图中的shuyx-user子工程。每个子工程都是以springboot为基础。选择导入基本的web依赖即可。注意springboot的版本随便选,后面要修改为与父工程的版本一致。
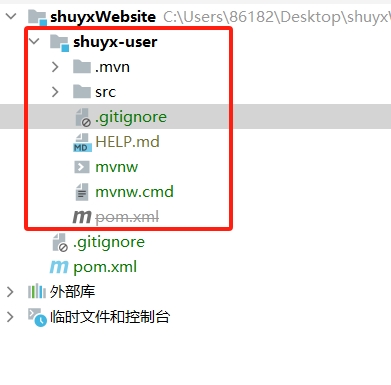
② 删除子工程中不必要的目录文件。例如maven等文件
③ 修改父工程的pom文件
给父工程的pom文件新增modules标签,让父子工程形成聚合关系。
<!--父pom文件新增modules标签-->
<modules>
    <module>shuyx-user</module>
</modules>
④ 修改子工程的pom文件
修改要点:
- 添加parent标签,替换为现在的父工程
- 删除不必要的标签。
- 添加packaging标签:如果子工程需要打出jar包,那么可以设置packaging标签。如果不需要打包,那么可以不添加packaging标签。
完整的子工程pom文件如下
<?xml version="1.0" encoding="UTF-8"?>
<project xmlns="http://maven.apache.org/POM/4.0.0" xmlns:xsi="http://www.w3.org/2001/XMLSchema-instance"
         xsi:schemaLocation="http://maven.apache.org/POM/4.0.0 https://maven.apache.org/xsd/maven-4.0.0.xsd">
    <modelVersion>4.0.0</modelVersion>
    <!--更换parent标签,替换为现在的父工程-->
    <parent>
        <artifactId>shuyxWebsite</artifactId>
        <groupId>com.shuyx</groupId>
        <version>1.0-SNAPSHOT</version>
    </parent>
    <!--子工程的相关信息-->
    <artifactId>shuyx-user</artifactId>
    <groupId>com.shuyx</groupId>
    <version>0.0.1-SNAPSHOT</version>
    <name>shuyx-user</name>
    <description>shuyx-user</description>
    <!--子工程的打包方式-->
    <packaging>jar</packaging>

    <!--子工程使用的依赖,不用写版本,版本继承自父工程-->
    <dependencies>
        <dependency>
            <groupId>org.springframework.boot</groupId>
            <artifactId>spring-boot-starter-web</artifactId>
        </dependency>
        <dependency>
            <groupId>org.springframework.boot</groupId>
            <artifactId>spring-boot-starter-test</artifactId>
            <scope>test</scope>
        </dependency>
    </dependencies>
    <!--工程打包插件-->
    <build>
        <plugins>
            <plugin>
                <groupId>org.springframework.boot</groupId>
                <artifactId>spring-boot-maven-plugin</artifactId>
            </plugin>
        </plugins>
    </build>
</project>
⑤ modules标签和parent标签
modules标签和parent标签,会让父工程与子工程形成一种继承和聚合的关系。
- maven中的继承关系:会让子工程自动继承父工程的依赖。
- maven中的聚合关系:可以让父工程批量管理子工程。例如对父工程进行编译,则相当于对所有的子工程进行编译。
注意:只有在父子工程都是maven工程的情况下,才会自动添加modules和parent标签。如果不是,则需要手动添加modules和parent标签才行。
3 总结
创建完父工程和子工程后,就可以开始根据业务需求编写代码了。
注意:父工程是空的,因此无论是空的maven父工程还是空的springboot父工程。都是要删除不必要的文件,保留pom文件的。因此只要pom文件是正确的,那么就ok。