[toc]
SpringDataJPA基础
Spring Data JPA,主要用于简化传统连接数据库中,dao层的写法的代码,重复代码太多等问题来提供的解决方案。
概述:
JPA( JPA规范 )和Hibernate的关系:
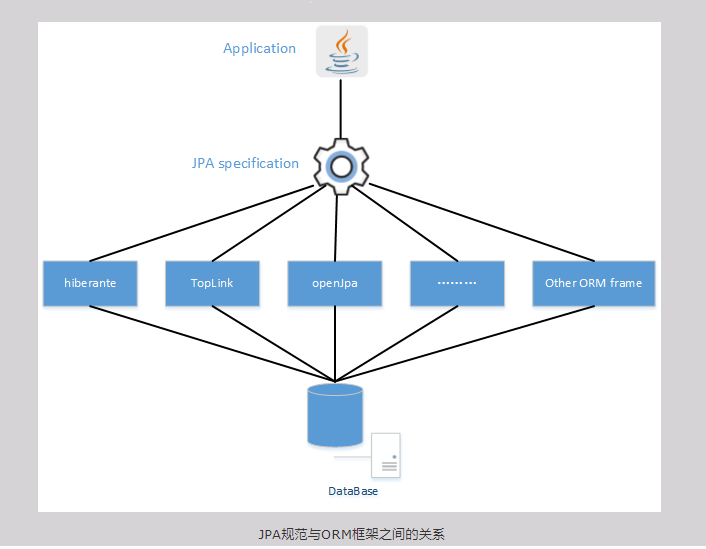
JPA,又可以叫做JPA规范。其本质上就是一种ORM规范,注意不是ORM框架——因为JPA并未提供ORM实现,它只是制订了一些规范,提供了一些编程的API接口,但具体实现则由用用服务器厂商来提供实现。例如:JBoss应用服务器底层就以Hibernate作为JPA的实现。
既然JPA作为一种规范——也就说JPA规范中提供的只是一些接口,显然接口不能直接拿来使用。虽然应用程序可以面向接口编程,但JPA底层一定需要某种JPA实现,否则JPA依然无法使用。
JPA规范的出现,其目的是统一各种ORM框架的规范,包括著名的Hibernate、TopLink等。当开发者面向JPA规范的接口,但底层的JPA实现可以任意切换:觉得Hibernate好的,可以选择Hibernate的JPA实现;觉得TopLink好的,可以选择TopLink的JPA实现……这样开发者可以避免为使用Hibernate学习一套ORM框架,为使用TopLink又要再学习一套ORM框架。
JPA和Hibernate的关系就像JDBC和JDBC驱动的关系。
jdbc 是Java 提供的数据库连接接口,该接口没有实现类。其接口的实现类( jdbc 驱动 )由每个数据库厂商提供。
JDBC(Java DataBase Connectivity) 是 sun 公司统一不同数据库与Java之间连接的规范。
JDBC访问数据库的主要工作:
- 得到JDBC驱动程序
- 使用DriverManager,Connection,Statement,ResulrSet等;
JPA是规范,该规范提供的只是一些接口,没有实现类。Hibernate除了作为ORM框架之外,它也实现JPA规范
JPA(Java Persistence API),java 持久性API。是sun 公司统一不同的ORM框架中的DAO层,Service层的写法(业务逻辑层次的写法)的规范。
JPA当问数据库主要工作
- 得到JDBC驱动程序
- 得到持久性提供者相关类库和配置文件
- 提供实体类
- 使用Persistence、EntityManagerFactory和Entity等接口。
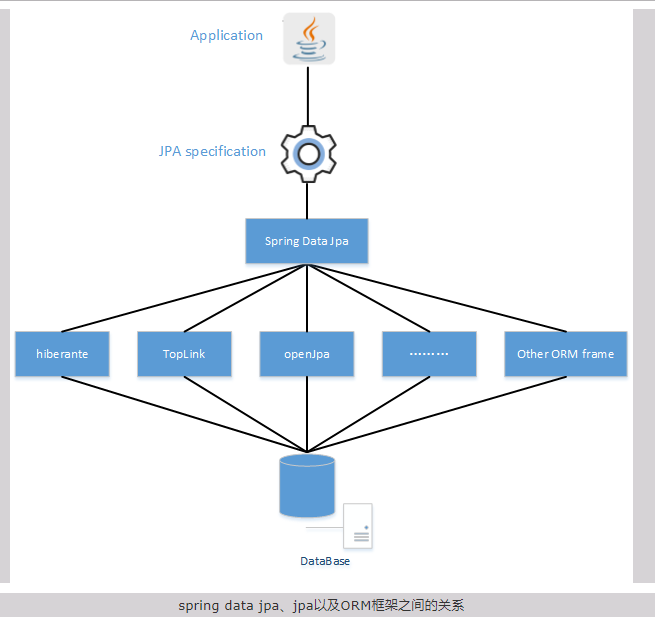
Spring Data JPA与JPA (JPA规范)的关系
- Spring Data JPA 是在JPA规范的基础下提供了Repository层的实现。
- 虽然ORM框架都实现了JPA规范,但是在不同ORM框架之间切换是需要编写的代码有一些差异,而通过使用Spring Data Jpa能够方便大家在不同的ORM框架中间进行切换而不要更改代码。并且Spring Data Jpa对Repository层封装的很好,可以省去不少的麻烦。
2.第一个Spring Data JPA:
①:配置spring ,JPA。
1.导入jar 包到工程文件的classpath 下:
- 加入spring的全部jar包: 路径: spring-framework-4.3.8.RELEASE\libs
- 添加spring data 的jar包: spring-data-commons-1.13.7.RELEASE.jar spring-data-jpa-1.11.8.RELEASE.jar
注意:spring-data-commons 2.0及其以上的的版本是要支持spring framework 5。
- 添加slf4j日志包(SpringData使用slf4作为日志框架): slf4j-api-1.7.25.jar
- 导入hobernate 需要的jar包: 需要的jar包所在是路径:hibernate-release-5.2.12.Final\lib\required
- 导入hibernate的 JPA的jar包: hibernate-jpamodelgen-5.2.12.Final.jar 路径: hibernate-release-5.2.12.Final\lib\jpa-metamodel-generator
- 加入 C3P0数据源 jar包: 路径:hibernate-release-5.2.12.Final\lib\optional\c3p0
- 加入MySQL驱动包: mysql-connector-java-5.1.42-bin.jar
2.配置spring 与JPA 的配置文件:
applicationContext.xml
<?xml version="1.0" encoding="UTF-8"?>
<beans xmlns="http://www.springframework.org/schema/beans"
	xmlns:p="http://www.springframework.org/schema/p"
	xmlns:jpa="http://www.springframework.org/schema/data/jpa"
	xmlns:mybatis="http://mybatis.org/schema/mybatis-spring"
    xmlns:xsi="http://www.w3.org/2001/XMLSchema-instance" xmlns:mvc="http://www.springframework.org/schema/mvc"
    xmlns:context="http://www.springframework.org/schema/context" xmlns:tx="http://www.springframework.org/schema/tx"
    xsi:schemaLocation="http://www.springframework.org/schema/mvc http://www.springframework.org/schema/mvc/spring-mvc-4.3.xsd
        http://www.springframework.org/schema/beans http://www.springframework.org/schema/beans/spring-beans.xsd
        http://www.springframework.org/schema/tx http://www.springframework.org/schema/tx/spring-tx-4.3.xsd
        http://www.springframework.org/schema/context http://www.springframework.org/schema/context/spring-context-4.3.xsd
        http://mybatis.org/schema/mybatis-spring
        http://mybatis.org/schema/mybatis-spring.xsd
        http://www.springframework.org/schema/data/jpa
        http://www.springframework.org/schema/data/jpa/spring-jpa.xsd">
       <!-- 配置c3p0数据源 -->
    <bean id="dataSource" class="com.mchange.v2.c3p0.ComboPooledDataSource">
			<property name="driverClass" value="com.mysql.jdbc.Driver"/>
			<property name="jdbcUrl" value="jdbc:mysql://localhost:3306/test2"/>
			<property name="user" value="root"/>
			<property name="password" value="123456"/>
	</bean>

	<!-- 配置jpa的EntityManagerFactory -->
	<bean id="entityManagerFactory" class="org.springframework.orm.jpa.LocalContainerEntityManagerFactoryBean">
		<!-- 指定数据源 -->
        <property name="dataSource" ref="dataSource"/>
        <!-- 指定Jpa持久化实现厂商类,这里以Hibernate为例 -->
        <property name="jpaVendorAdapter">
        	<bean class="org.springframework.orm.jpa.vendor.HibernateJpaVendorAdapter"/>
        </property>
        <!-- 指定扫描@Entity等注解的实体类包路径 -->
        <property name="packagesToScan" value="com.entity"/>
        <!-- 指定JPA属性;如Hibernate中指定是否显示SQL的是否显示、方言等 -->
        <property name="jpaProperties">
            <props>
                <prop key="hibernate.dialect">org.hibernate.dialect.MySQL5InnoDBDialect</prop>
                <!-- 生成数据表的列的生存策略 -->
                <prop key="hibernate.ejb.naming_strategy">org.hibernate.cfg.ImprovedNamingStrategy</prop>
                <prop key="hibernate.show_sql">true</prop>
                <prop key="hibernate.format_sql">true</prop>
                <prop key="hibernate.hbm2ddl.auto">update</prop>
            </props>
        </property>
	</bean>


    <!-- 配置 Jpa事务管理器 -->
    <bean id="transactionManager" class="org.springframework.orm.jpa.JpaTransactionManager">
        <property name="entityManagerFactory" ref="entityManagerFactory"/>
    </bean>

    <!-- 开启注解事务 -->
    <tx:annotation-driven transaction-manager="transactionManager"/>

   	<!--配置springdata , 重要配置:启用扫描并自动创建代理的功能, 要加入jpa的命名空间
   			base-package :扫描Repository bean的路径,并注入到ioc容器中
   	-->
     <jpa:repositories base-package="com.entity" entity-manager-factory-ref="entityManagerFactory"/>

	<!--把实体包的类注入到ioc容器中-->
	<context:component-scan base-package="com.entity"/>
</beans>
②:在spring的配置文件中配置Spring Data
在spring的配置文件applicationContext.xml中添加代码:
 	<!--配置springdata , 重要配置:启用扫描并自动创建代理的功能, 要加入Spring data jpa的命名空间
   	base-package :扫描Repository bean的路径,并注入到ioc容器中
   	-->
     <jpa:repositories base-package="com.entity" entity-manager-factory-ref="entityManagerFactory"/>
注意:在配置文件中加上Spring Date JPA 的命名空间。
> xmlns:jpa="http://www.springframework.org/schema/data/jpa"
> http://www.springframework.org/schema/data/jpa
> http://www.springframework.org/schema/data/jpa/spring-jpa.xsd
③:声明持久化接口,该接口必须继承 Repostory
1.创建持久化类:
Person.java
package com.entity;
import java.util.Date;
import javax.persistence.Entity;
import javax.persistence.GeneratedValue;
import javax.persistence.Id;
import javax.persistence.Table;
import org.springframework.stereotype.Repository;

/*
 * @Entity注释指名这是一个实体Bean,
 * @Table注释指定了Entity所要映射带数据库表,其中@Table.name()用来指定映射表的表名。
 * 如果缺省@Table注释,系统默认采用类名作为映射表的表名。
 *
 * */
@Table(name="jpa_Person")
@Entity
public class Person {
	/*
	 * @Id 标注用于声明一个实体类的属性映射为数据库的主键列。
	 * @GeneratedValue 用于标注主键的生成策略(  这是默认选项  : @GeneratedValue(strategy=GenerationType.AUTO) ),
	 *
	 * */
	@GeneratedValue
	@Id
	private Integer id;
	private String name;
	private Integer gender;
	private Date birth;

	public Person(){}

	@Column(length=20)              //设置该字段的长度为20
	public Integer getId() {
		return id;
	}

	public void setId(Integer id) {
		this.id = id;
	}

	public String getName() {
		return name;
	}

	public void setName(String name) {
		this.name = name;
	}

	....

	@Override
	public String toString() {
		return "Person [id=" + id + ", name=" + name + ", gender=" + gender
				+ ", birth=" + birth + "]";
	}
}
2.创建持久化类的接口,该接口必须继承 Repostory。 注意:类与接口放在一起。
PersonRepsotory.java
package com.entity;
import org.springframework.data.repository.Repository;
import org.springframework.data.repository.RepositoryDefinition;
/*
   Repository<Person, Integer> 中 Person为对应的持久化类,Integer 为对应的数据表主键的java类型
*/
public interface PersonRepsotory extends Repository<Person, Integer>{
	public Person getById(Integer id);
}
④:test:
public class test {
	public static void main(String[] args) {
		ApplicationContext app = new ClassPathXmlApplicationContext("applicationContext.xml");
		PersonRepsotory personRepsotory = app.getBean(PersonRepsotory.class);
		Person person = personRepsotory.getById(1);
		System.out.println(person);
	}
}
控制台打印结果:
Hibernate:
    select
        person0_.id as id1_0_,
        person0_.birth as birth2_0_,
        person0_.gender as gender3_0_,
        person0_.name as name4_0_
    from
        jpa_Person person0_
    where
        person0_.id=?

Person [id=1, name=xiaoming, gender=1, birth=2017-12-15 14:01:58.0]
⑤:分析
<jpa:repositories base-package="com.entity" entity-manager-factory-ref="entityManagerFactory"/>- 当spring初始化时,会扫描 base-package 指定的包目录及其子目录,当扫描到继承 Repository 接口的 接口对象时,会为该接口对象创建代理对象并注入到 IOC 容器中。
public interface PersonRepsotory extends Repository<Person, Integer>{
	public Person getById(Integer id);
}- Repository 是一个空接口,不含任何方法。Spring data 也可以是实现Repository的其他子接口,这些子接口定义了一些CRUD 方法或分页查询的方法。
3.继承Repository 接口 或 实现@RepositoryDefinition 注解:
1.继承Repository 接口:
package com.entity;
import org.springframework.data.repository.Repository;
import org.springframework.data.repository.RepositoryDefinition;
public interface PersonRepsotory extends Repository<Person, Integer>{
	public Person getById(Integer id);
}- Repository 是一个空接口(标记),其中没有任何实现方法。
// Repository 是一个空接口,其中没有任何实现方法
public interface Repository<T, ID extends Serializable> {
}- 当我们编写的接口继承 Repository 时。应该在spring的配置文件中编写如下配置。
<jpa:repositories base-package="com.entity" entity-manager-factory-ref="entityManagerFactory"/>- 当spring 的ioc 容器开启时,IOC 容器会扫描 base-package 指向的路径,若扫描到继承 Repository接口的类,ioc 容器会把它标记为一个Repository bean 。
- 被标记为Repository bean,会被注入到ioc 容器中。
- 继承 Repository的接口,需要在其中编写 具有一定规范的方法。
2.实现@RepositoryDefinition 注解:
		@RepositoryDefinition(domainClass=Person.class,idClass=Integer.class)
		public interface PersonRepsotory{
				public Person getById(Integer id);
		}
3.Repsotory的几个子接口:
①:CrudRepsotory : 继承自Repsotory, 实现了一组CRUD的方法。
②:PagingAndSortingRepsotory : 继承自CrudRepsotory, 实现了一组分页排序的方法。
③:JpaRepsotory : 继承自PagingAndSortingRepsotory ,实现了一组jpa规范的方法 。
④:自定义的 XxxRepsotory : 需要继承JpaRepsotory,这样该自定义的接口,就具备通用的数据访问控制层的能力。
⑤:JpaSpecificationExecutor : 不属于Repsotory 的体系。可实现一组JPA Criteria 查询相关的方法。
4.在XxxRepsotory 接口中编写CRUD方法(CRUD方法编写具有一定的规则):
1.使用关键字的方式定义方法名:
@Table(name="jpa_Person")
@Entity
public class Person {
	@GeneratedValue
	@Id
	private Integer id;
	private String name;
	private Integer gender;
	private Date birth;
	public Person(){}
	//省略get/set/toString() 方法。
}
1. 查询方法必须以 find | read | get 开头。2. 当涉及到条件查询时,属性的首字母大写,并且若有多个属性,则必须以关键字相连接。
例子:
public interface PersonRepsotory extends Repository<Person, Integer>{
	//通过id查询 对象  , where id=?1
	public Person getById(Integer id);
	//条件查询,以name ,gender 为条件  ~where name=?1 and gender=?2
	public Person getByNameAndGender(String name,Integer gender);
	// where name like %?1  and  gender < ?2
	public List<Person> getByNameEndingWithAndGenderLessThan(String name,Integer gender);
	// where name in (?1,?2,?3,~)
	public List<Person> getByNameIn(List<String> name);
}
2.使用 @Query 注解的方式(可以用自定义 JPQL 语句来实现更为复杂的查询):
JPQL语句: 类似于SQL 语句,只不过SQL语句查询是通过表名,字段名。而JPQL语句查询通过 实体类名与其属性名。
注意:
- JPQ语句中,实体名和属性区分大小写,保留关键字不区分大小写。
- @Param注解的包是在:org.springframework.data.jpa.repository.Query;
- 向@Query 注解传递参数有两种: ①占位符 ?。 ②命名参数+@Param 注解 。 ③:使用原生sql语句来查询。
public interface PersonRepsotory extends Repository<Person, Integer>{
	/*
	 * 1.  为@Query 注解传递参数方法一: 使用占位符 ? ,注意 第一个占位符 是 ?1 ,第二个占位符是 ?2 。
	 *
	 * 2.  为@Query 注解传递参数方法二: 使用命名参数的方式。
	 *
	 * 			@Query(" select p from Person p where id =:id")
				public Person getbY_ID_by_Param(@Param("id") Integer id);
	 *
	 *    @Param作用是, 指定 Integer id 是 @Query注解中的 id
	 *
	 * 3. 在@Query 注解中可以编写原生的 SQL 语句来查询结果。jpa_person是表名
	 * 			nativeQuery=true :表面@Query注解的内容是原生sql语句。
	 *
	 * 			@Query(value=" select * from jpa_person  where id = ? ",nativeQuery=true)
				public Person getbY_ID_by_Param2(Integer id);
	 *
	 * */

	@Query("select p from Person p")
	public List<Person> getAll();
	@Query("select p from Person p where id= ?1 ")
	public Person getby_id(Integer id);
	@Query("select p from Person p where name= ?1 and gender=?2 ")
	public Person getbyname_and_gender(String name,Integer gender);
	@Query("select p from Person p where name like %?1%  and  gender < ?2 ")
	public Person getby_name_and_gender(String name,Integer gender);
	//使用命名参数的方式查询
	@Query(" select p from Person p where id =:id")
	public Person getbY_ID_by_Param(@Param("id") Integer id);
	// 使用原生SQL的方式查询
	@Query(value=" select * from jpa_person  where id = ? ",nativeQuery=true)
	public Person getbY_ID_by_Param2(Integer id);
}
3.使用 @Query,@Modifying,@Transactional注解来实现update, delete(springdata 的jpql语句不支持 insert,但可以用sql的方式编写insert):
PersonRepsotory.java
public interface PersonRepsotory extends Repository<Person, Integer>{
/*
* 1. 使用 @Modifying 进行修饰. 以通知 SpringData, 这是一个 UPDATE 或 DELETE 操作 。
* 由于update ,delete 操作涉及到修改数据库的数据,所以要使用 @Transactional注解,用于开启事务,提交事务。
*
* 2. 可以选择在@Query 注解中写入 原生sql的方式来实现 insert ,update, delete
* */
@Transactional
@Modifying
@Query("UPDATE Person set name=?1 where id=?2")
public int update_name(String name,Integer id);
@Transactional
@Modifying
@Query("delete from Person where id=?1")
public int delete_PersonByid(Integer id);
//使用原生sql语句的方式进行update
@Transactional
@Modifying
@Query(value="update jpa_person set name=? where id=?",nativeQuery=true)
public int update_name2(String name,Integer id);
//使用原生sql语句的方式进行 delete
@Transactional
@Modifying
@Query(value="delete from jpa_person where id=?",nativeQuery=true)
public int delete_PersonByid2(Integer id);
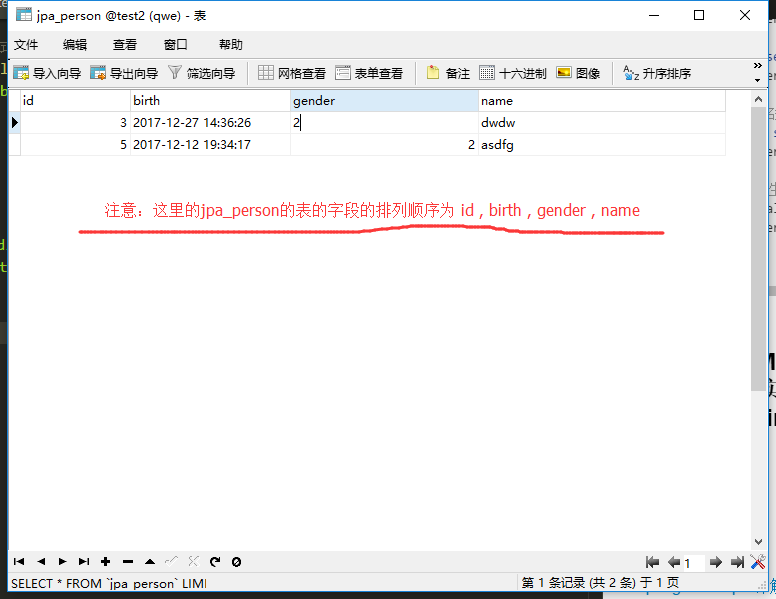
//使用原生sql语句的方式进行insert , 注意 sql语句的参数的顺序 需要与 数据库中表的字段的顺序对应
@Transactional
@Modifying
@Query(value="insert into jpa_person values(?,?,?,?)",nativeQuery=true)
public int insertPerson(Integer id,Date birth,Integer gender,String name);
//使用原生sql语句的方式进行insert ,注意 这里在sql语句中指定了参数的排列顺序
@Transactional
@Modifying
@Query(value="insert into jpa_person(id,name,gender,birth) values(?,?,?,?)",nativeQuery=true)
public int insertPerson2(Integer id,String name,Integer gender,Date birth);
}test.java:
public class test {
	public static void main(String[] args) {
		ApplicationContext app = new ClassPathXmlApplicationContext("applicationContext.xml");
		PersonRepsotory personRepsotory = app.getBean(PersonRepsotory.class);
		int a=personRepsotory.update_name("xiaoming", 3);
		int b=personRepsotory.update_name2("xiaoho",44);
		int c=personRepsotory.delete_PersonByid(2);
		int d=personRepsotory.delete_PersonByid2(3);
		int e=personRepsotory.insertPerson(22, new Date(), 1, "ssssss");
		int f=personRepsotory.insertPerson2(334,"xx",2,new Date());
	}

}
注意: ①:由于update ,delete,insert 操作涉及到修改数据库的数据,所以要使用 @Transactional注解,提交事务。 ②:当使用insert 增加数据库时,若sql语句中没有指定参数顺序,那么参数顺序需要与数据库中表的字段的顺序对应。
没有指定参数顺序: insert into jpa_person values(?,?,?,?)
指定了参数顺序: insert into jpa_person(id,name,gender,birth) values(?,?,?,?)
4.事务操作(update,insert,delete)在springdata jpa的使用(一般把涉及到事务操作的方法,不放在 XxxRepsotory 接口中,单独放在service层中):
PersonRepsotory.java
public interface PersonRepsotory extends Repository<Person, Integer>{
	@Modifying
	@Query("UPDATE Person set name=?1 where id=?2")
	public int  update_name(String name,Integer id);
	@Modifying
	@Query("delete from Person where id=?1")
	public int delete_PersonByid(Integer id);
}
PersonService.java:
....

@Service
public class PersonService{
	/*
	  @Autowired 注解使用的前提条件,在配置文件中:
					<!--把实体包的类注入到ioc容器中-->
					<context:component-scan base-package="com.entity"/>
	*/
	@Autowired
	private PersonRepsotory personrepsotory;

	//设计到事务操作的方法,不放在 XxxRepsotory 接口中,单独放在service层中。

	@Transactional
	public void update(Integer id){
		personrepsotory.update_name(name,id);
	}

	@Transactional
	public void delete(String name,Integer id){
		personrepsotory.delete_PersonByid(id);
	}
}
test.java:
public class test {
	public static void main(String[] args) {
		ApplicationContext app = new ClassPathXmlApplicationContext("applicationContext.xml");
		//PersonRepsotory personRepsotory = app.getBean(PersonRepsotory.class);
		PersonService pers=app.getBean(PersonService.class);
		pers.update("xiaoming",3);
		pers.delete(3);
	}
}