[toc]
SpringMVC笔记3
当前SpringMVC的版本为5.3.22
RESTful风格
RESTful是一种新的请求方式风格。
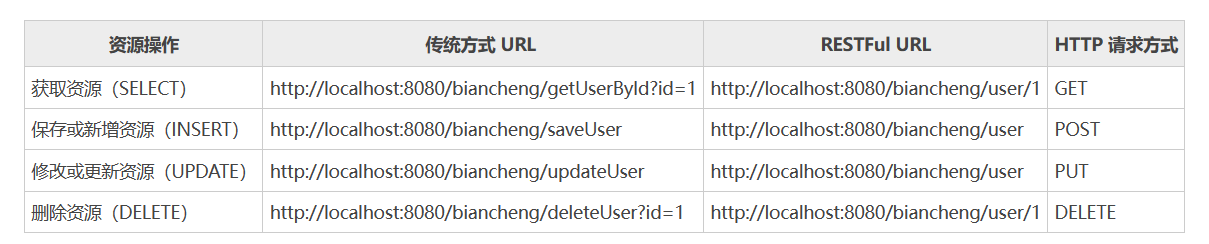
RESTFul 提倡我们使用统一的风格来设计请求 URL,其规则如下。
- 请求URL只用来标识和定位资源,不得包含任何与操作相关的动词。
- 当请求中需要携带参数时,RESTFul 允许将参数通过斜杠(/)拼接到 URL 中。
- HTTP 协议中有四个表示操作方式的动词:GET 用来获取资源, POST 用来新建资源, PUT 用来更新资源, DELETE 用来删除资源。
下图是传统方式请求URL与RESTful方式请求URL的对比。
RESTful风格的分类:
- RESTful风格下请求的方式不同,则代表不同的具体操作。
http://localhost/users查询全部用户信息 GET(查询)http://localhost/users/1查询指定用户信息 GET(查询)http://localhost/users添加用户信息 POST(新增)http://localhost/users修改用户信息 PUT(更新)http://localhost/users/1删除用户信息 DELETE(删除)- 发送GET请求是用来做查询
- 发送POST请求是用来做新增
- 发送PUT请求是用来做修改
- 发送DELETE请求是用来做删除
注意:RESTful风格是约定方式,约定不是规范,可以打破,所以称RESTful风格,而不是RESTful规范。
RESTful的例子
以下是RESTful的例子
@Controller
public class BookController {
    //新增,POST请求
    @RequestMapping(value = "/books",method = RequestMethod.POST)
    @ResponseBody
    public String save(@RequestBody Book book){
        System.out.println("book save..." + book);
        return "{'module':'book save'}";
    }

    //删除,DELETE请求
    @RequestMapping(value = "/books/{id}",method = RequestMethod.DELETE)
    @ResponseBody
    public String delete(@PathVariable Integer id){
        System.out.println("book delete..." + id);
        return "{'module':'book delete'}";
    }

    //修改,PUT请求
    @RequestMapping(value = "/books",method = RequestMethod.PUT)
    @ResponseBody
    public String update(@RequestBody Book book){
        System.out.println("book update..." + book);
        return "{'module':'book update'}";
    }

    //查询,GET请求
    @RequestMapping(value = "/books/{id}",method = RequestMethod.GET)
    @ResponseBody
    public String getById(@PathVariable Integer id){
        System.out.println("book getById..." + id);
        return "{'module':'book getById'}";
    }

    //查询全部,GET请求
    @RequestMapping(value = "/books",method = RequestMethod.GET)
    @ResponseBody
    public String getAll(){
        System.out.println("book getAll...");
        return "{'module':'book getAll'}";
    }
}
上面例子中,有些代码的重复性太高。下面是改进后的例子
@Controller
@RequestMapping("/books")
public class BookController {
    //新增
	//@RequestMapping(method = RequestMethod.POST)
    @PostMapping
    @ResponseBody
    public String save(@RequestBody Book book){
        System.out.println("book save..." + book);
        return "{'module':'book save'}";
    }
    //删除
    //@RequestMapping(value = "/{id}",method = RequestMethod.DELETE)
    @DeleteMapping("/{id}")
    @ResponseBody
    public String delete(@PathVariable Integer id){
        System.out.println("book delete..." + id);
        return "{'module':'book delete'}";
    }
    //修改
    //@RequestMapping(method = RequestMethod.PUT)
    @PutMapping
    @ResponseBody
    public String update(@RequestBody Book book){
        System.out.println("book update..." + book);
        return "{'module':'book update'}";
    }
    //查询
    //@RequestMapping(value = "/{id}",method = RequestMethod.GET)
    @GetMapping("/{id}")
    @ResponseBody
    public String getById(@PathVariable Integer id){
        System.out.println("book getById..." + id);
        return "{'module':'book getById'}";
    }
    //查询全部
    //@RequestMapping(method = RequestMethod.GET)
    @GetMapping
    @ResponseBody
    public String getAll(){
        System.out.println("book getAll...");
        return "{'module':'book getAll'}";
    }

}
SpringMVC设置静态资源放行
请求路径:http://localhost/pages/books.html
当访问上面的路径的时候,SpringMVC根据/pages/books.html请求路径去controller找对应的方法,找不到会报404的错误。
SpringMVC为什么会拦截静态资源呢?
之前在自定义servlet web容器配置类中,设置了拦截所有请求。自然将获取静态资源的请求也拦截了。
//自定义servlet web容器配置类
public class ServletContainersInitConfig extends AbstractDispatcherServletInitializer {
    //.......................省略

    //拦截所有请求,并将所有请求交给spring mvc处理
    // "/" 满足/pages/books.html规则
    protected String[] getServletMappings() {
        return new String[]{"/"};
    }
}
SpringMVC如何设置静态资源放行?
新建SpringMvcSupport配置类,继承WebMvcConfigurationSupport类。设置静态资源放行
@Configuration
public class SpringMvcSupport extends WebMvcConfigurationSupport {
    //设置静态资源访问过滤,当前类需要设置为配置类,并被扫描加载
    @Override
    protected void addResourceHandlers(ResourceHandlerRegistry registry) {
        //当访问/pages/????时候,从/pages目录下查找内容
        registry.addResourceHandler("/pages/**").addResourceLocations("/pages/");
        registry.addResourceHandler("/js/**").addResourceLocations("/js/");
        registry.addResourceHandler("/css/**").addResourceLocations("/css/");
        registry.addResourceHandler("/plugins/**").addResourceLocations("/plugins/");
    }
}- 该配置类是在config目录下,SpringMvcConfig配置类扫描的是controller包,所以该配置类还未生效,要想生效需要对SpringMvcConfig配置类进行修改。让其扫描config目录。
@Configuration
@ComponentScan({"com.itheima.controller","com.itheima.config"})
@EnableWebMvc
public class SpringMvcConfig {
}
SpringMVC 设置统一响应结果
随着业务的增长,我们需要返回的数据类型会越来越多。对于前端开发人员在解析数据的时候就比较凌乱了,所以对于前端来说,如果后台能够返回一个统一的数据结果,前端在解析的时候就可以按照一种方式进行解析。开发就会变得更加简单。
统一响应结果封装思路分析为:
- 为了封装返回的结果数据:创建响应结果类,封装响应数据到data属性中
- 为了封装返回的数据是何种操作及是否操作成功:封装操作结果到code属性中
- 操作失败后为了封装返回的错误信息:封装特殊消息到message(msg)属性中
① 步骤1:创建Result统一响应结果类
public class Result {
//响应内容数据
private Object data;
//响应结果编码,用于区分操作。可以用简化配置0或1表示成功失败
private Integer code;
//响应结果消息消息,可选属性
private String msg;
public Result() {
}
public Result(Integer code,Object data) {
this.data = data;
this.code = code;
}
public Result(Integer code, Object data, String msg) {
this.data = data;
this.code = code;
this.msg = msg;
}
//setter...getter...省略
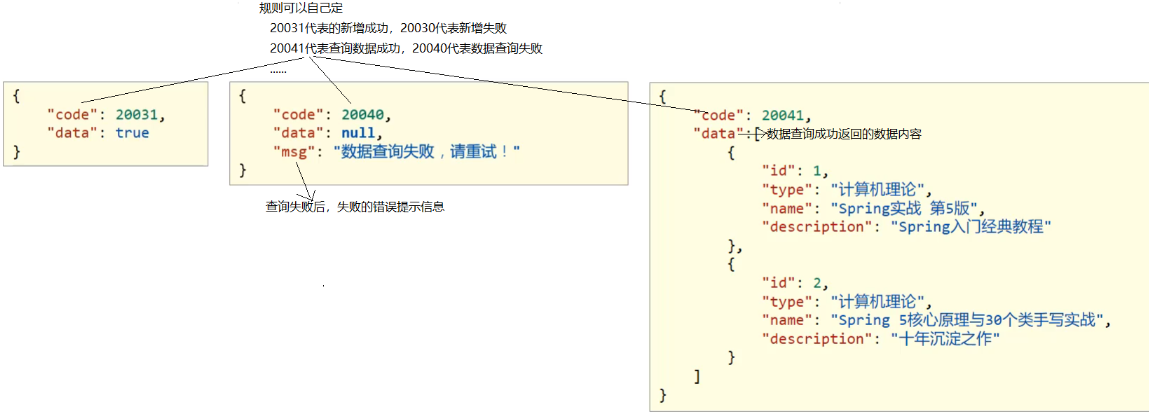
}② 步骤2:定义返回码Code类
//状态码
public class Code {
    public static final Integer SAVE_OK = 20011;
    public static final Integer DELETE_OK = 20021;
    public static final Integer UPDATE_OK = 20031;
    public static final Integer GET_OK = 20041;
    public static final Integer SAVE_ERR = 20010;
    public static final Integer DELETE_ERR = 20020;
    public static final Integer UPDATE_ERR = 20030;
    public static final Integer GET_ERR = 20040;
}
③ 步骤3:修改Controller类的返回值
//统一每个方法的响应结果
@RestController
@RequestMapping("/books")
public class BookController {
    @Autowired
    private BookService bookService;

    @PostMapping
    public Result save(@RequestBody Book book) {
        boolean flag = bookService.save(book);
        return new Result(flag ? Code.SAVE_OK:Code.SAVE_ERR,flag);
    }

    @PutMapping
    public Result update(@RequestBody Book book) {
        boolean flag = bookService.update(book);
        return new Result(flag ? Code.UPDATE_OK:Code.UPDATE_ERR,flag);
    }

    @DeleteMapping("/{id}")
    public Result delete(@PathVariable Integer id) {
        boolean flag = bookService.delete(id);
        return new Result(flag ? Code.DELETE_OK:Code.DELETE_ERR,flag);
    }

    @GetMapping("/{id}")
    public Result getById(@PathVariable Integer id) {
        Book book = bookService.getById(id);
        Integer code = book != null ? Code.GET_OK : Code.GET_ERR;
        String msg = book != null ? "" : "数据查询失败,请重试!";
        return new Result(code,book,msg);
    }
}
④ 步骤4:启动服务测试
此时前端可以根据返回的结果,先从中获取code,根据code判断,如果成功则取data属性的值,如果失败,则取msg中的值做提示。
SpringMVC 设置统一异常处理
异常的种类及出现异常的原因:
- 框架内部抛出的异常:因使用不合规导致
- 数据层抛出的异常:因外部服务器故障导致(例如:服务器访问超时)
- 业务层抛出的异常:因业务逻辑书写错误导致(例如:遍历业务书写操作,导致索引异常等)
- 表现层抛出的异常:因数据收集、校验等规则导致(例如:不匹配的数据类型间导致异常)
- 工具类抛出的异常:因工具类书写不严谨不够健壮导致(例如:必要释放的连接长期未释放等)
SpringMVC对于异常的统一处理已经提供了一套解决方案:
- 自定义异常处理器: 集中的、统一的处理项目中出现的异常。
- 自定义异常处理器需要添加@RestControllerAdvice注解修饰
自定义异常处理器的使用
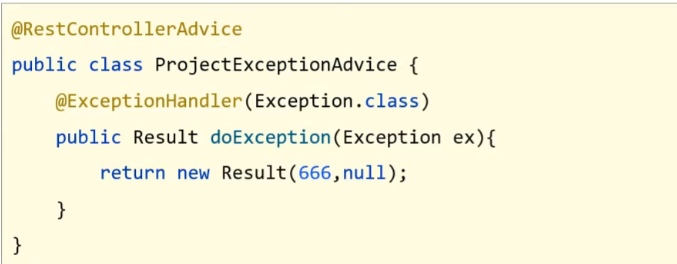
① 步骤1:创建自定义异常处理器类,并将异常内容封装为统一响应结果
//@RestControllerAdvice用于标识当前类为REST风格对应的异常处理器
@RestControllerAdvice
public class ProjectExceptionAdvice {
    //除了自定义的异常处理器,保留对Exception类型的异常处理,用于处理非预期的异常
    //可以针对其他特殊异常进行专门异常处理。这个方法是针对Exception的异常处理
    @ExceptionHandler(Exception.class)
    public Result doException(Exception ex){
      	System.out.println("已发生异常");
        return new Result(666,null,"已发生异常");
    }
}
确保SpringMvcConfig能够扫描到异常处理器类
② 步骤2:修改SpringMVC配置类,让其能扫描到异常处理类
@Configuration
@ComponentScan({"com.example.controller","com.example.util"})
@EnableWebMvc
public class SpringMVCConfig {
    //SpringMVC配置类
}
③ 步骤3:让程序抛出异常
@GetMapping("/{id}")
public Result getById(@PathVariable Integer id) {
    //抛出异常
  	int i = 1/0;
    Book book = bookService.getById(id);
    Integer code = book != null ? Code.GET_OK : Code.GET_ERR;
    String msg = book != null ? "" : "数据查询失败,请重试!";
    return new Result(code,book,msg);
}
④ 步骤4:运行程序,测试
至此,就算后台执行的过程中抛出异常,最终也能按照统一响结果格式返回给前端。
@RestControllerAdvice,@ExceptionHandler注解
@RestControllerAdvice注解(@ControllerAdvice + @ResponseBody + @Component) 类型: 类注解。 位置: 定义类上方。 作用: 为类做增强功能。
@ExceptionHandler 注解 类型: 方法注解。 位置: 专用于异常处理的控制器方法上方。 作用: 设置指定异常的处理方案,功能等同于控制器方法,出现异常后终止原始控制器执行,并转入当前方法执行。
说明: 此类方法可以根据处理的异常不同,制作多个方法分别处理对应的异常
自定义异常类 + 异常处理器
① 步骤1:自定义异常类
//自定义异常处理器,用于封装异常信息,对异常进行分类
public class BusinessException extends RuntimeException{
    private Integer code;
    // message 和 cause 继承自RuntimeException类
    public Integer getCode() {
        return code;
    }
    public void setCode(Integer code) {
        this.code = code;
    }
    public BusinessException(Integer code, String message) {
        super(message);
        this.code = code;
    }
    public BusinessException(Integer code, String message, Throwable cause) {
        super(message, cause);
        this.code = code;
    }
}
说明:
- 让自定义异常类继承RuntimeException类的好处是,后期在抛出这两个异常的时候,就不用在try...catch...或throws了
- 自定义异常类中添加code属性的原因是为了更好的区分异常是来自哪个业务的
② 步骤2:将其他异常包成自定义异常
public Book getById(Integer id) {
    //将可能出现的异常进行包装,转换成自定义异常并抛出
    try{
        int i = 1/0;
    }catch (Exception e){
        //抛出自定义异常
        throw new BusinessException(500,"服务器访问超时,请重试!",e);
    }
    return bookDao.getById(id);
}
具体的包装方式有:
- 方式一:
try{}catch(){}在catch中重新throw我们自定义异常即可。 - 方式二:直接throw自定义异常即可
③ 步骤3:自定义异常处理器类中处理自定义异常
//@RestControllerAdvice用于标识当前类为REST风格对应的异常处理器
@RestControllerAdvice
public class ProjectExceptionAdvice {
    //针对自定义异常BusinessException的异常处理
    @ExceptionHandler(BusinessException.class)
    public Result doBusinessException(BusinessException ex){
        //记录日志
        //发送消息给运维
        //发送邮件给开发人员,ex对象发送给开发人员
        return new Result(ex.getCode(),null,ex.getMessage());
    }

    //除了自定义的异常处理器,保留对Exception类型的异常处理,用于处理非预期的异常
    @ExceptionHandler(Exception.class)
    public Result doOtherException(Exception ex){
        //记录日志
        //发送消息给运维
        //发送邮件给开发人员,ex对象发送给开发人员
        return new Result(Code.SYSTEM_UNKNOW_ERR,null,"系统繁忙,请稍后再试!");
    }
}
④ 步骤4:运行程序
不管后台哪一层抛出异常,都会以我们与前端约定好的方式进行返回,前端只需要把信息获取到,根据返回的正确与否来展示不同的内容即可。
小结 上面例子的异常处理方式为: 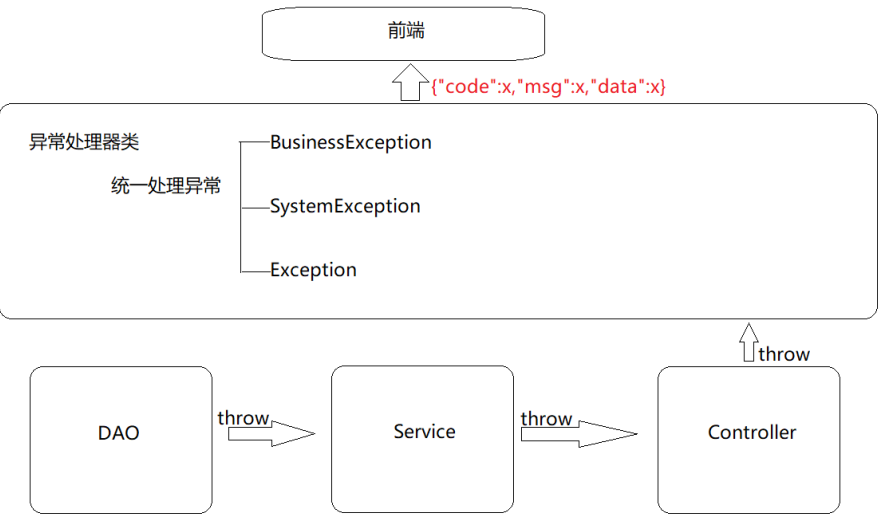
SpringMVC拦截器
拦截器介绍
讲拦截器之前,先看一张图: 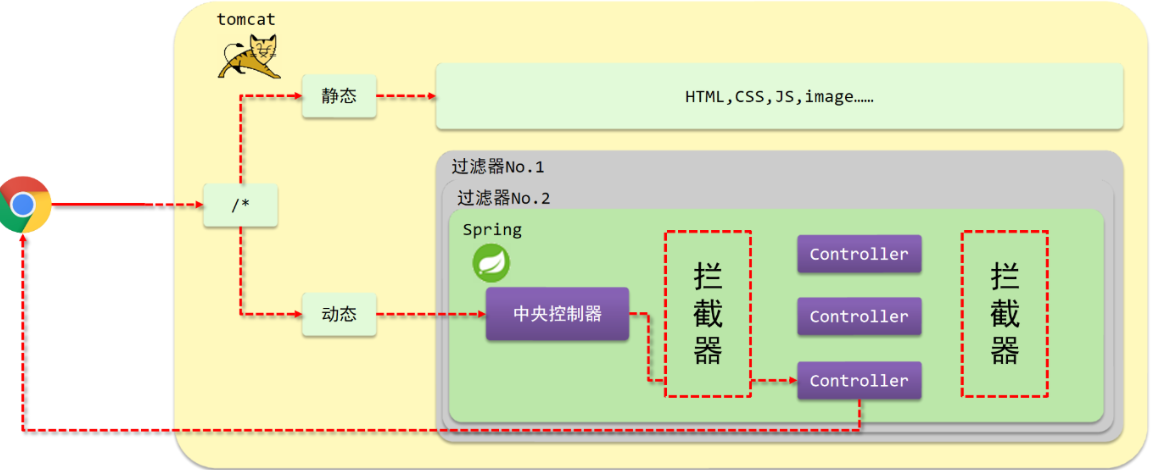
(1)浏览器发送一个请求会先到Tomcat的web服务器 (2)Tomcat服务器接收到请求以后,会去判断请求的是静态资源还是动态资源 (3)如果是静态资源,会直接到Tomcat的项目部署目录下去直接访问 (4)如果是动态资源,就需要交给项目的后台代码进行处理 (5)在找到具体的方法之前,我们可以去配置过滤器(可以配置多个),按照顺序进行执行 (6)然后进入到到中央处理器(SpringMVC的DispatcherServlet),DispatcherServlet会根据配置的规则进行拦截 (7)如果满足规则,则进行处理,找到其对应的controller类中的方法进行执行,完成后返回结果 (8)如果不满足规则,则不进行处理 (9)这个时候,如果我们需要在每个Controller方法执行的前后添加业务,具体该如何来实现? (10) 我们可以通过拦截器来实现这个功能。
什么是拦截器?
拦截器(Interceptor)是 Spring MVC 提供的一种强大的功能组件。它可以对用户请求进行拦截,并在请求进入控制器方法前后,执行一些指定的操作。
拦截器和过滤器在作用和执行顺序上很相似,那么拦截器和过滤器之间的区别是什么?
- 归属不同:过滤器Filter属于Servlet技术,拦截器Interceptor属于SpringMVC技术
- 拦截内容不同:过滤器Filter对所有访问进行过滤,拦截器Interceptor仅针对SpringMVC的方法进行拦截。
拦截器的执行流程
单个拦截器
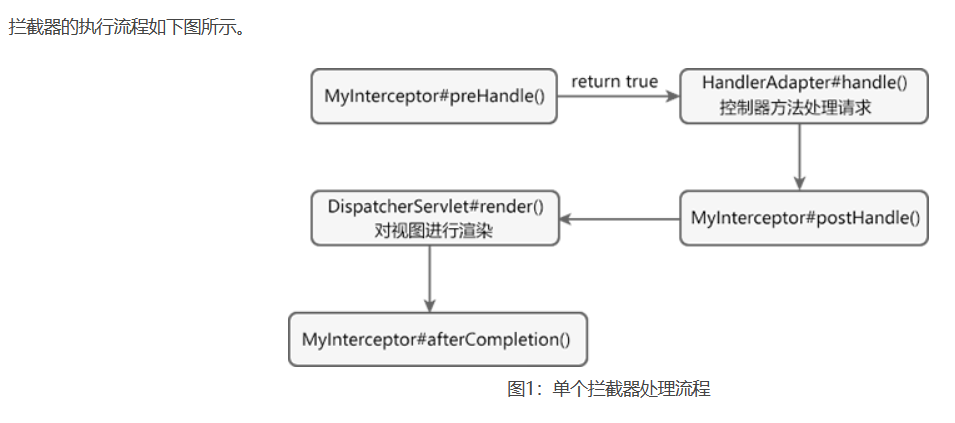
拦截器处理流程的步骤如下:
- 当请求的路径与拦截器拦截的路径相匹配时,程序会先执行拦截器类(MyInterceptor)的 preHandl() 方法。若该方法返回值为 true,则继续向下执行 Controller(控制器)中的方法,否则将不再向下执行;
- 控制器方法对请求进行处理;
- 调用拦截器的 postHandl() 方法,此时我们可以对请求域中的模型(Model)数据和视图做出进一步的修改;
- 通过 DispatcherServlet 的 render() 方法对视图进行渲染;
- 调用拦截器的 afterCompletion () 方法,完成资源清理、日志记录等工作。
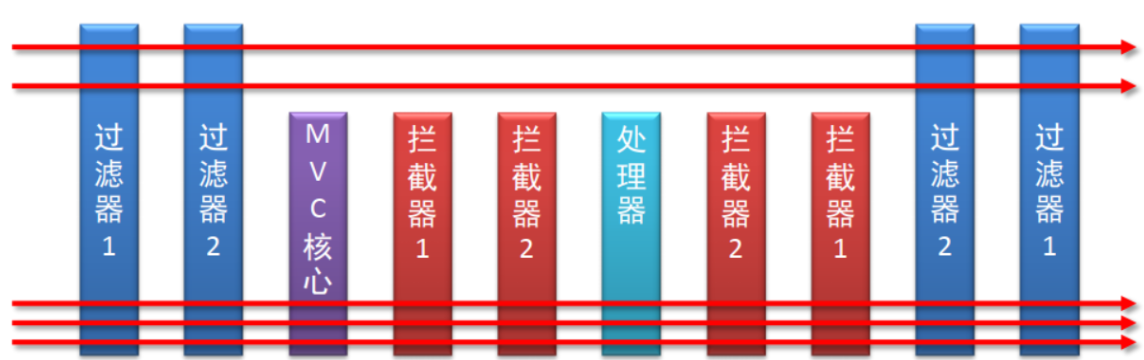
多个拦截器
在项目中,通常都不会只有一个拦截器,多个不同的拦截器来实现不同的功能。在程序运行期间,拦截器的执行是有一定的顺序的,该顺序与拦截器在配置文件中定义的顺序有关。
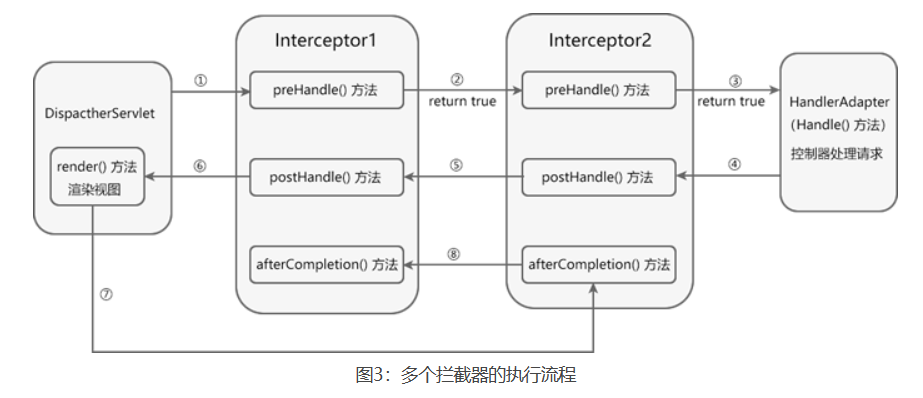
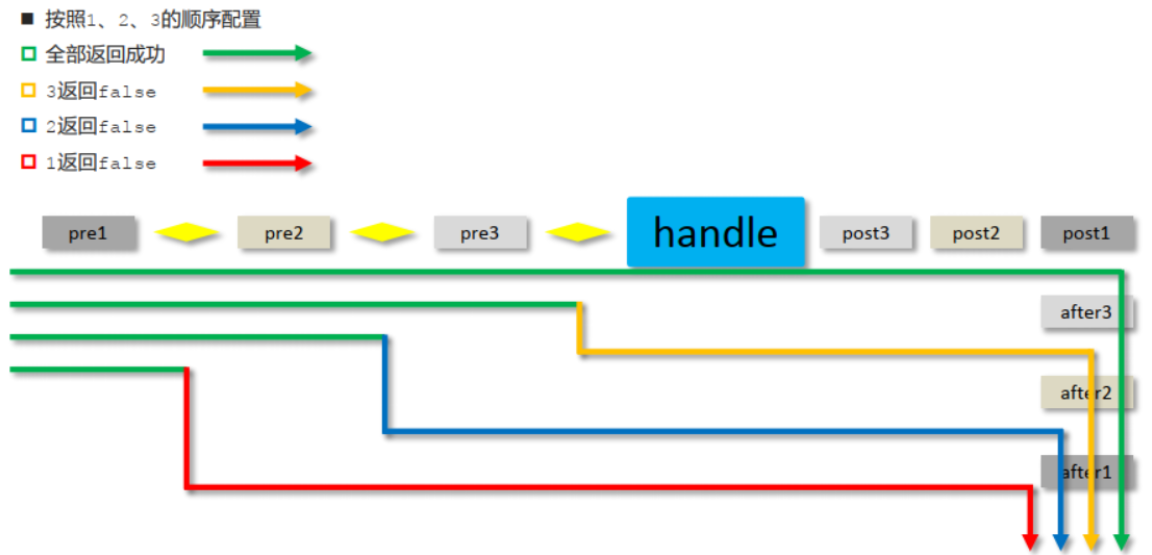
如果其中有拦截器的 preHandle() 方法返回了 false,各拦截器方法执行情况如下。
- 第一个返回 preHandle() 方法 false 的拦截器以及它之前的拦截器的 preHandle() 方法都会执行。
- 所有拦截器的 postHandle() 都不会执行。
- 第一个返回 preHandle() 方法 false 的拦截器之前的拦截器的 afterComplation() 方法都会执行。
拦截器案例
单个拦截器
① 步骤1:创建自定义拦截器类
自定义拦截器类需要实现HandlerInterceptor接口,重写HandlerInterceptor接口中的三个方法。
@Component
//自定义拦截器类,实现HandlerInterceptor接口
//注意当前类必须受Spring容器控制
public class ProjectInterceptor implements HandlerInterceptor {
    @Override
    //原始方法调用前执行的内容
    public boolean preHandle(HttpServletRequest request, HttpServletResponse response, Object handler) throws Exception {
        System.out.println("preHandle...");
        return true;
    }

    @Override
    //原始方法调用后执行的内容
    public void postHandle(HttpServletRequest request, HttpServletResponse response, Object handler, ModelAndView modelAndView) throws Exception {
        System.out.println("postHandle...");
    }

    @Override
    //原始方法调用完成后执行的内容
    public void afterCompletion(HttpServletRequest request, HttpServletResponse response, Object handler, Exception ex) throws Exception {
        System.out.println("afterCompletion...");
    }
}
注意: 自定义拦截器类要被SpringMVC容器扫描到。
② 步骤2:把自定义拦截器类加入到SpringMvcSupport配置类中
@Configuration
public class SpringMvcSupport extends WebMvcConfigurationSupport {
    @Autowired
    private ProjectInterceptor projectInterceptor;

    //.......

    //将自定义拦截器注册到SpringMvc配置类中
    @Override
    protected void addInterceptors(InterceptorRegistry registry) {
        //配置拦截器的拦截路径
        // 下面只会对/books路径及其子路径进行拦截
        registry.addInterceptor(projectInterceptor).addPathPatterns("/books","/books/*");
    }
}
③ 步骤3:SpringMVC添加SpringMvcSupport包扫描
@Configuration
@ComponentScan({"com.itheima.controller","com.itheima.config"})
@EnableWebMvc
public class SpringMvcConfig{
}
④ 步骤4:运行程序测试
preHandle...
postHandle...
afterCompletion...
⑤ 可以简化SpringMvcSupport配置类的编写
SpringMvcConfig配置类可以代替SpringMvcSupport配置类。之后就不用再写SpringMvcSupport类了。
@Configuration
@ComponentScan({"com.itheima.controller"})
@EnableWebMvc
//实现WebMvcConfigurer接口可以简化开发,但具有一定的侵入性
public class SpringMvcConfig implements WebMvcConfigurer {
    @Autowired
    private ProjectInterceptor projectInterceptor;

    @Override
    public void addInterceptors(InterceptorRegistry registry) {
        //配置拦截器的拦截路径
        registry.addInterceptor(projectInterceptor).addPathPatterns("/books","/books/*");
    }
}
多个拦截器
① 步骤1:创建多个拦截器类,实现HandlerInterceptor接口,并重写接口中的方法
@Component
public class ProjectInterceptor implements HandlerInterceptor {
    @Override
    public boolean preHandle(HttpServletRequest request, HttpServletResponse response, Object handler) throws Exception {
        System.out.println("preHandle...");
        return true;
    }

    @Override
    public void postHandle(HttpServletRequest request, HttpServletResponse response, Object handler, ModelAndView modelAndView) throws Exception {
        System.out.println("postHandle...");
    }

    @Override
    public void afterCompletion(HttpServletRequest request, HttpServletResponse response, Object handler, Exception ex) throws Exception {
        System.out.println("afterCompletion...");
    }
}

//---------------------

@Component
public class ProjectInterceptor2 implements HandlerInterceptor {
    @Override
    public boolean preHandle(HttpServletRequest request, HttpServletResponse response, Object handler) throws Exception {
        System.out.println("preHandle...222");
        return false;
    }
    @Override
    public void postHandle(HttpServletRequest request, HttpServletResponse response, Object handler, ModelAndView modelAndView) throws Exception {
        System.out.println("postHandle...222");
    }

    @Override
    public void afterCompletion(HttpServletRequest request, HttpServletResponse response, Object handler, Exception ex) throws Exception {
        System.out.println("afterCompletion...222");
    }
}
② 步骤2:配置SpringMvcConfig类,将多个拦截器类注册其中
@Configuration
@ComponentScan({"com.itheima.controller"})
@EnableWebMvc
public class SpringMvcConfig implements WebMvcConfigurer {
    //依赖多个拦截器
    @Autowired
    private ProjectInterceptor projectInterceptor;
    @Autowired
    private ProjectInterceptor2 projectInterceptor2;
    @Override
    public void addInterceptors(InterceptorRegistry registry) {
        //配置多个拦截器
        registry.addInterceptor(projectInterceptor).addPathPatterns("/books","/books/*");
        registry.addInterceptor(projectInterceptor2).addPathPatterns("/books","/books/*");
    }
}
③ :运行程序
preHandle...
preHandle...222
postHandle...222
postHandle...
afterCompletion...222
afterCompletion...
拦截器的处理方法
前置处理方法
前置处理方法:原始方法之前运行preHandle
//request:请求对象
//response:响应对象
//handler:被调用的处理器对象,本质上是一个方法对象,对反射中的Method对象进行了再包装
public boolean preHandle(HttpServletRequest request, HttpServletResponse response, Object handler) throws Exception {
    //使用request对象可以获取请求数据中的内容,如获取请求头的`Content-Type`
    String contentType = request.getHeader("Content-Type");
    System.out.println("preHandle..."+contentType);
    //使用handler参数,可以获取方法的相关信息
    HandlerMethod hm = (HandlerMethod)handler;
    String methodName = hm.getMethod().getName();
    System.out.println("preHandle..."+methodName);
    return true;
}
后置处理方法
后置处理方法:原始方法运行后运行,如果原始方法被拦截,则不执行
public void postHandle(HttpServletRequest request,HttpServletResponse response,
    Object handler,ModelAndView modelAndView) throws Exception {
    System.out.println("postHandle");
}- modelAndView:如果处理器执行完成具有返回结果,可以读取到对应数据与页面信息,并进行调整。由于现在都是返回json数据,所以该参数的使用率不高。
完成处理方法
完成处理方法:拦截器最后执行的方法,无论原始方法是否执行
public void afterCompletion(HttpServletRequest request,HttpServletResponse response,
    Object handler,Exception ex) throws Exception {
    System.out.println("afterCompletion");
}
这三个方法中,最常用的是preHandle前置处理方法,在这个方法中可以通过返回值来决定是否要进行放行,可以把业务逻辑放在该方法中,如果满足业务则返回true放行,不满足则返回false拦截。