博客优化
[toc]
# 博客优化
当前vuepress博客使用的主题是vuepress-reco。当前使用版本为1.x版本。
vuepress-reco网站 http://v1.vuepress-reco.recoluan.com/ (opens new window)
# 自动提交代码到github仓库
通过脚本来自动提交代码到github仓库。
push.sh
# 该脚本主要分两个部分。
# 第一个部分: 提交代码到博客源代码仓库 https://github.com/suichentree/suichenblog.git
# 第一个部分: 将源代码打包运行,生成博客页面代码后。将页面代码提交到博客页面仓库 https://github.com/suichentree/suichentree.github.io.git

# 注意1: 在git终端中运行脚本。
# 注意2: 使用 source push.sh 命令运行该文件。bash push.sh 命令无法执行脚本中的cd命令,source命令可以。

# 定义commit方法
function commit() {
    #定义变量commitMessage,并接受外部输入赋值
    read -p "输入commitMessage: " commitMessage
    echo "commitMessage is  $commitMessage"
    #将暂存区的文件提交到本地分支中
    git commit -m $commitMessage
}

# 定义push方法
function push(){
    # 本地分支强制推送最新文件到远程分支
    git push -f origin master
    # $?可以获取git push -f origin master命令是否运行成功,成功返回0,否则非0。
    if [ $? -eq 0 ]
    then
        # 上传成功,方法结束
        echo "SUCCESS , git push success"
    else
        # 上传失败,重新执行上传命令
        echo "ERROR , git push fail"
        # 延迟5秒
        sleep 5s
        # 重新执行push方法
        echo "Push Code to Remote Repository Again -------------------"
        push
    fi
}


# 脚本从这里开始--------------
echo "Start Run push.sh -------------------"

# 第一部分 start--------------------------
echo "Start Run Part1 -------------------"

# 将所有变动文件添加到暂存区
git add -A

# 检查是否有文件需要提交
check_commit=`git status`
if [[ $check_commit =~ "Changes to be committed:" ]]
then
    # 还有文件要提交
    echo "YES,some file need commit."
    # 执行提交方法
    commit
else
    # 没有文件需要提交
    echo "NO, no file need commit"
fi

# 执行push方法
push

# 第二部分 start--------------------------
echo "Start Run Part2 -------------------"

# 生成博客静态文件
npm run build

# 进入生成的文件夹
cd public

# 初始化为git仓库
git init

# 添加到暂存区
git add -A

# 获取当前时间
time3=$(date "+%Y-%m-%d %H:%M:%S")

# 提交到本地分支
git commit -m "deploy blog $time3"

# 添加远程库地址
git remote add origin https://github.com/suichentree/suichentree.github.io.git

# 执行push方法
push

# 回到上级目录中
cd ..

# 脚本从这里结束--------------
echo "push.sh run finish -------------------"
2
3
4
5
6
7
8
9
10
11
12
13
14
15
16
17
18
19
20
21
22
23
24
25
26
27
28
29
30
31
32
33
34
35
36
37
38
39
40
41
42
43
44
45
46
47
48
49
50
51
52
53
54
55
56
57
58
59
60
61
62
63
64
65
66
67
68
69
70
71
72
73
74
75
76
77
78
79
80
81
82
83
84
85
86
87
88
89
90
91
92
93
94
# 给文章下方添加评论功能
vuepress-reco主题内置评论插件 @vuepress-reco/vuepress-plugin-comments,可以根据自己的喜好选择 Valine 或者 Vssue;
Valine和Vssue都是评论插件,我选择的是Vssue评论插件。
Vssue是什么?
Vssue插件官网地址 (opens new window)
Vssue 是一个 Vue 驱动的、基于 Issue 的评论插件。
特点是支持多个代码托管平台,包括 GitHub、GitLab、Bitbucket、 Gitee 和 Gitea。因为基于 Vue,可以作为 Vue 插件使用,轻松集成到 Vue 应用中。
这里我选择的是GitHub平台来保存我的评论数据。
实现方式
- 创建 GitHub OAuth App
登录你的GitHub账户-》选择setting -》Developer Settings -》OAuth Apps -》New OAuth App

- 填写信息
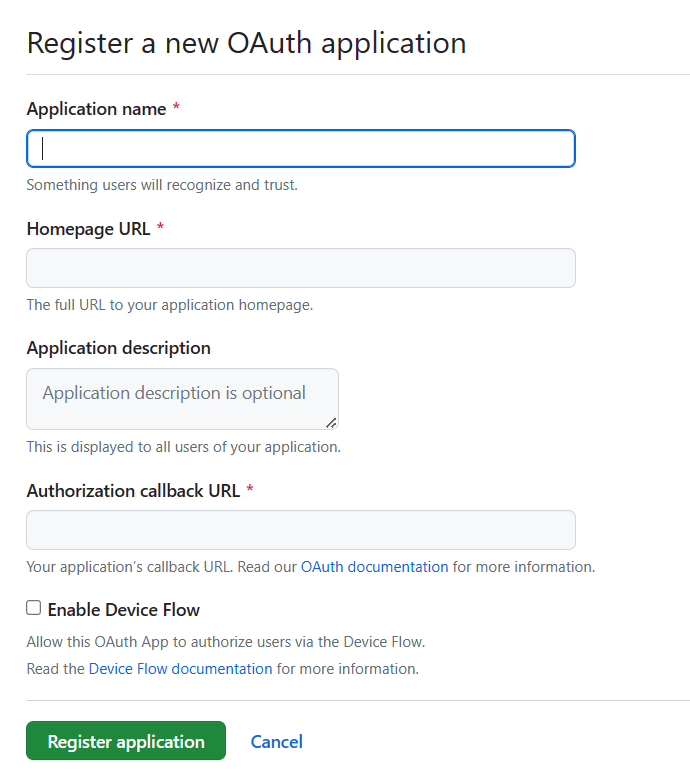
- Application name: 随便填写一个名称。
- Homepage URL:填写博客的首页地址
- Authorization callback URL:填写博客的首页地址
然后点击注册应用。
- 如图可以看到id已经生成了。之后点击按钮生成密钥。
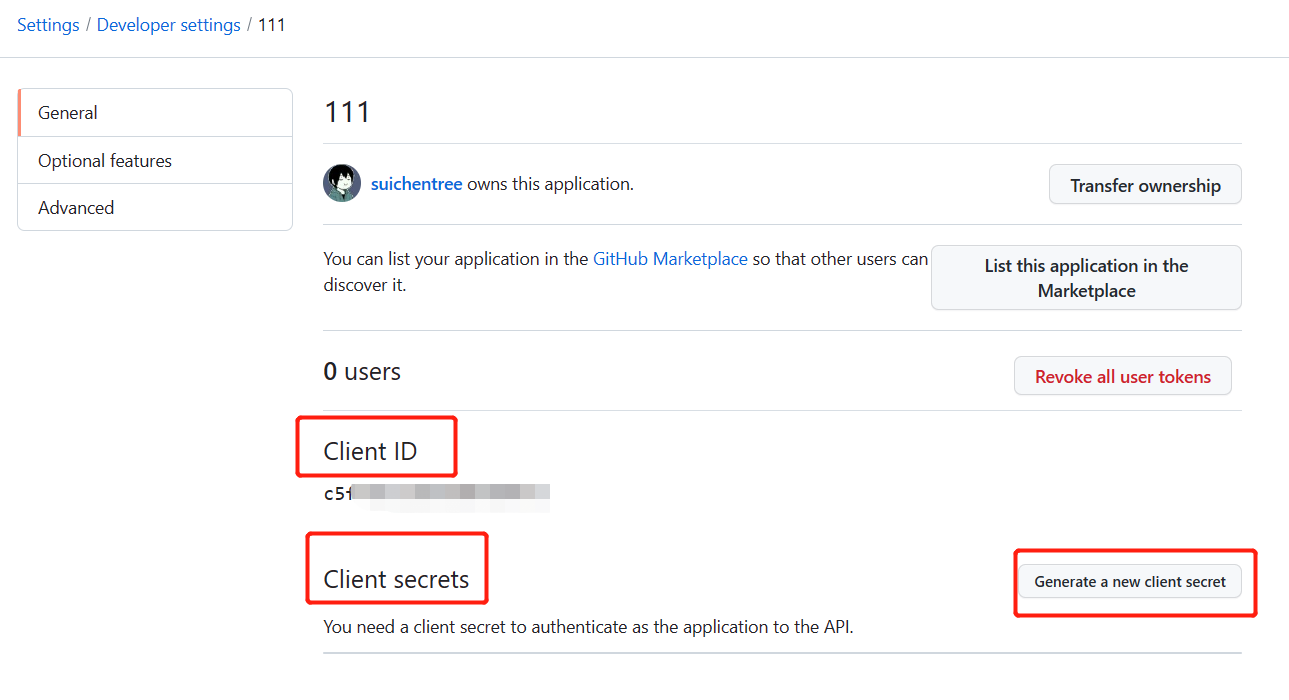
- 然后在工程的config.js上添加代码
//config.js
module.exports = {
  theme: 'reco',
  themeConfig: {
    vssueConfig: {
      platform: 'github',
      owner: 'OWNER_OF_REPO',
      repo: 'NAME_OF_REPO',
      clientId: 'YOUR_CLIENT_ID',
      clientSecret: 'YOUR_CLIENT_SECRET',
    }
  }
}
2
3
4
5
6
7
8
9
10
11
12
13
- clientId: 填写你刚刚生成的clientId
- clientSecret:填写你刚刚生成的clientSecret
- owner:填写你的github名称,例如suichentree
- repo:填写你的博客所在的仓库名称。例如
suichentree.github.io
然后打包工程,更新博客代码到仓库中。
然后可以在每篇文章的最底部。看到评论区域
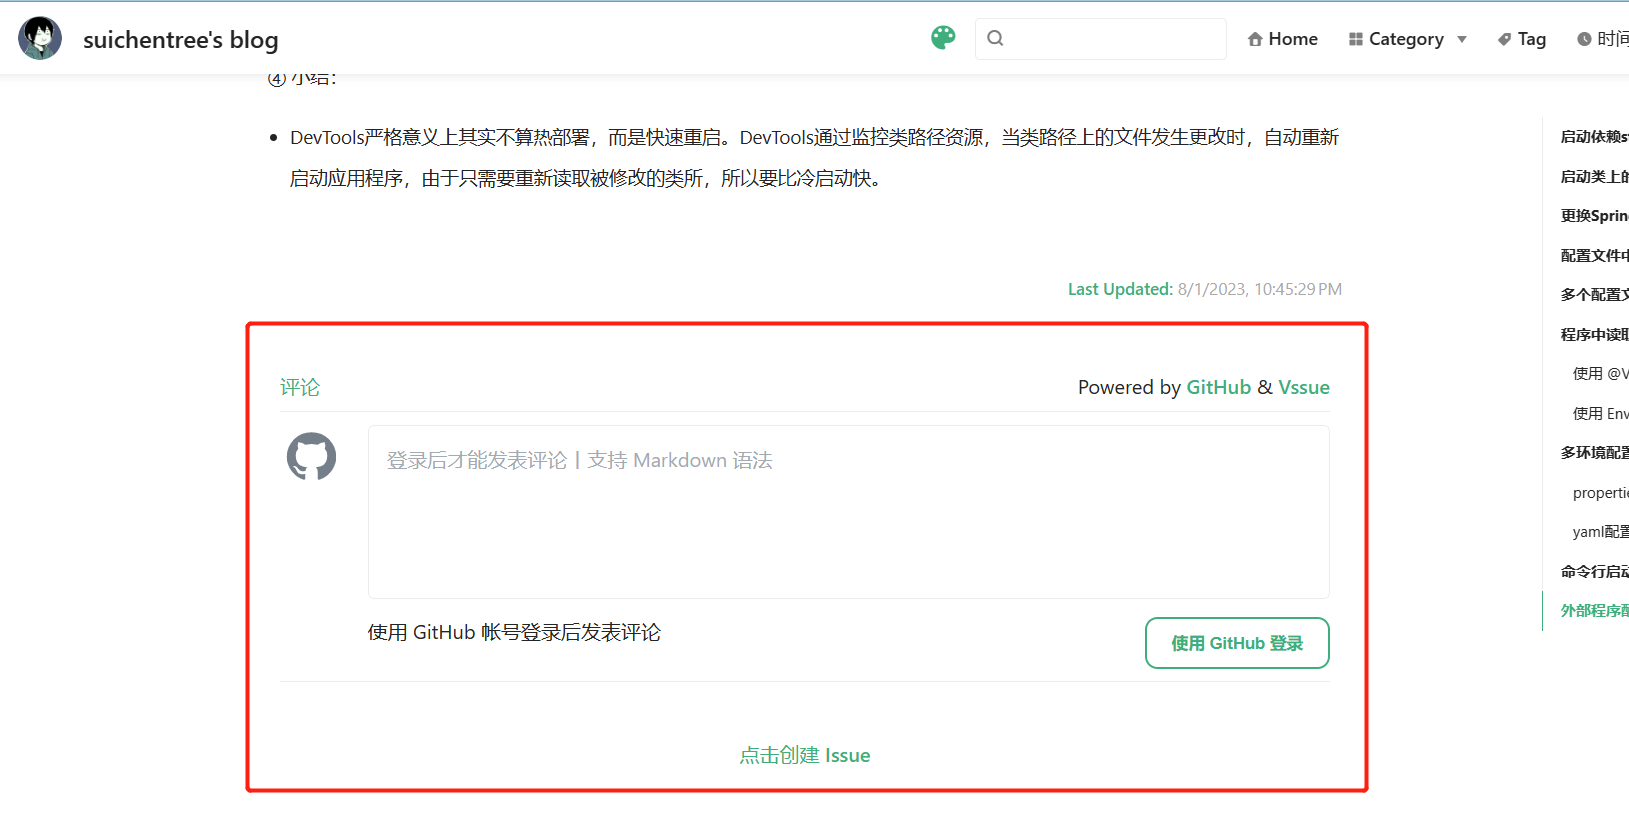
如何评论?
- 直接点击上图的登录。用你的github账号先登录。
- 然后点击创建 Issue
- 之后就可以在评论框中输入你的评论。点击发表评论按钮即可。
- 之后就可以看到你的评论了。
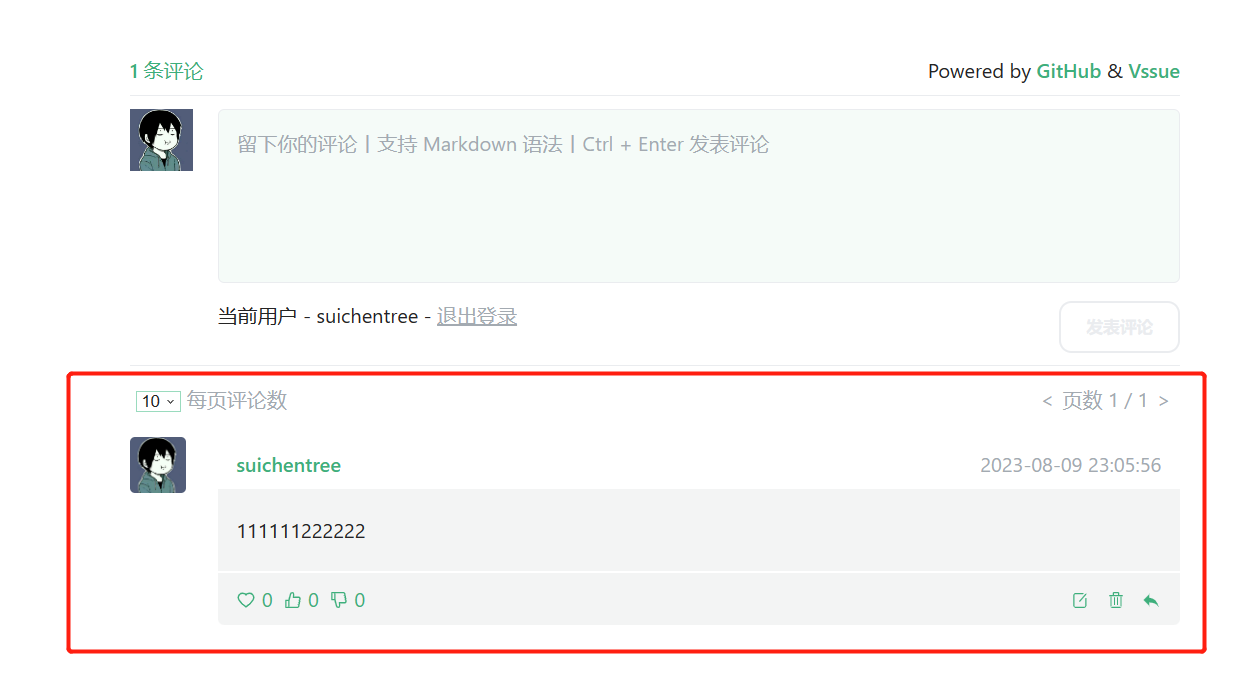
评论数据是如何存储的?
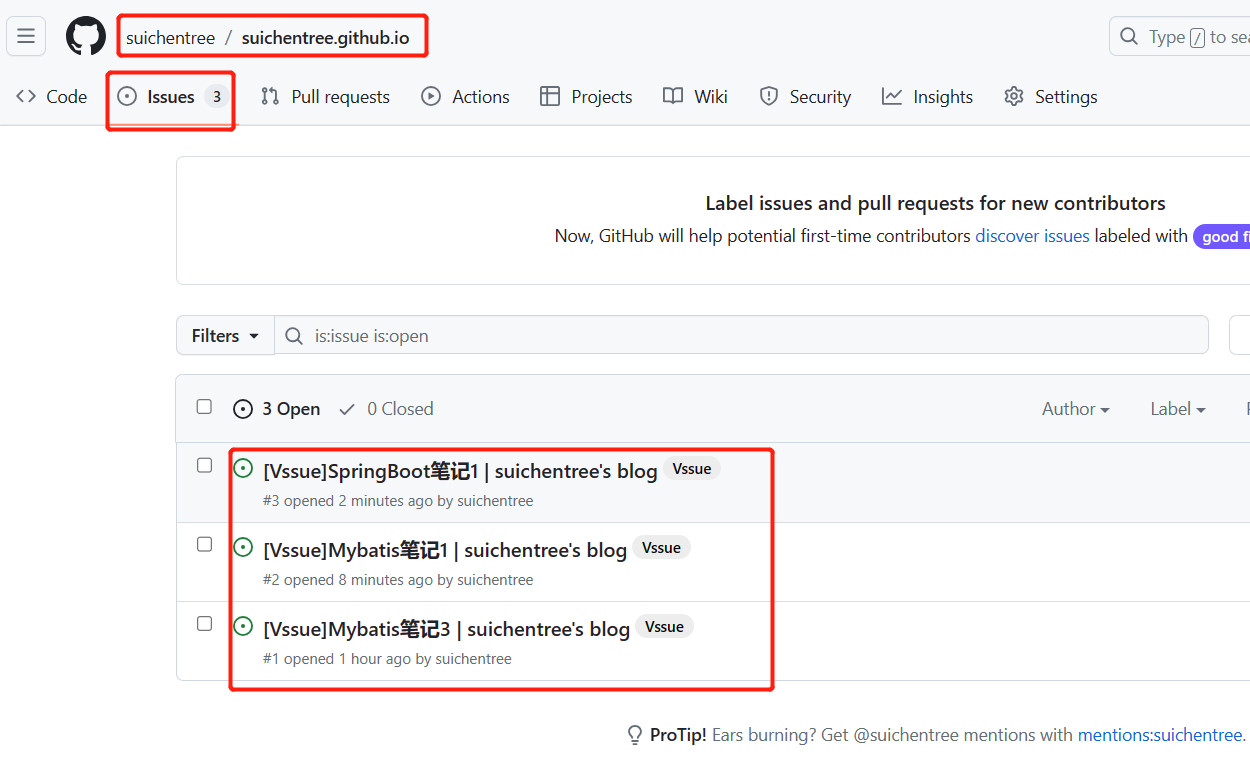
当你在某个文章最下方点击创建 Issue 的时候。相当于给博客仓库,创建了一个issue, 评论内容就是issue的内容。
# 博客首页副标题添加打字机效果
由于vuepress-reco主题本身没有打字机效果插件,于是在npm网站上找到打字机效果插件,并给博客首页的副标题添加打字机效果。

打字机效果插件:vuepress-plugin-typed vuepress-plugin-typed链接 (opens new window)
实现方法
- 安装插件
npm i vuepress-plugin-typed
- 在工程的config.js中配置打字机插件
// config.js
module.exports = {
  //.....
  "plugins": [
    //副标题-打字机效果的插件
    ['typed',{
      // 首页副标题对应的标签选择器
      selector: '.home-blog .hero .description',
      // 打字内容
      strings: [
        "海里的咸鱼 (;-_-)ᴇᴍᴍᴍ ——suichentree",
        "路漫漫其修远兮,吾将上下而求索 ——屈原"
      ],
      typeSpeed: 150, // 打字速度
      backSpeed: 100, // 回退速度
      showCursor: true, //是否显示光标
      startDelay: 1000,    //延迟开始打字
      backDelay: 2000,  //延迟多少时间开始回退
      }
    ]
  ]
}
2
3
4
5
6
7
8
9
10
11
12
13
14
15
16
17
18
19
20
21
22
- 在博客首页README.md设置副标题。如果不设置副标题,会导致打字机效果无法生效
# tagline副标题为空,真正的副标题内容配置在config.js中
tagline: ""
2
- 打字机插件更多的配置,点击链接自己查阅。
vuepress-plugin-typed地址 (opens new window)
# 博客添加留言板页面
vuepress-reco主题本身没有开启留言板页面,需要自行添加。
留言板效果
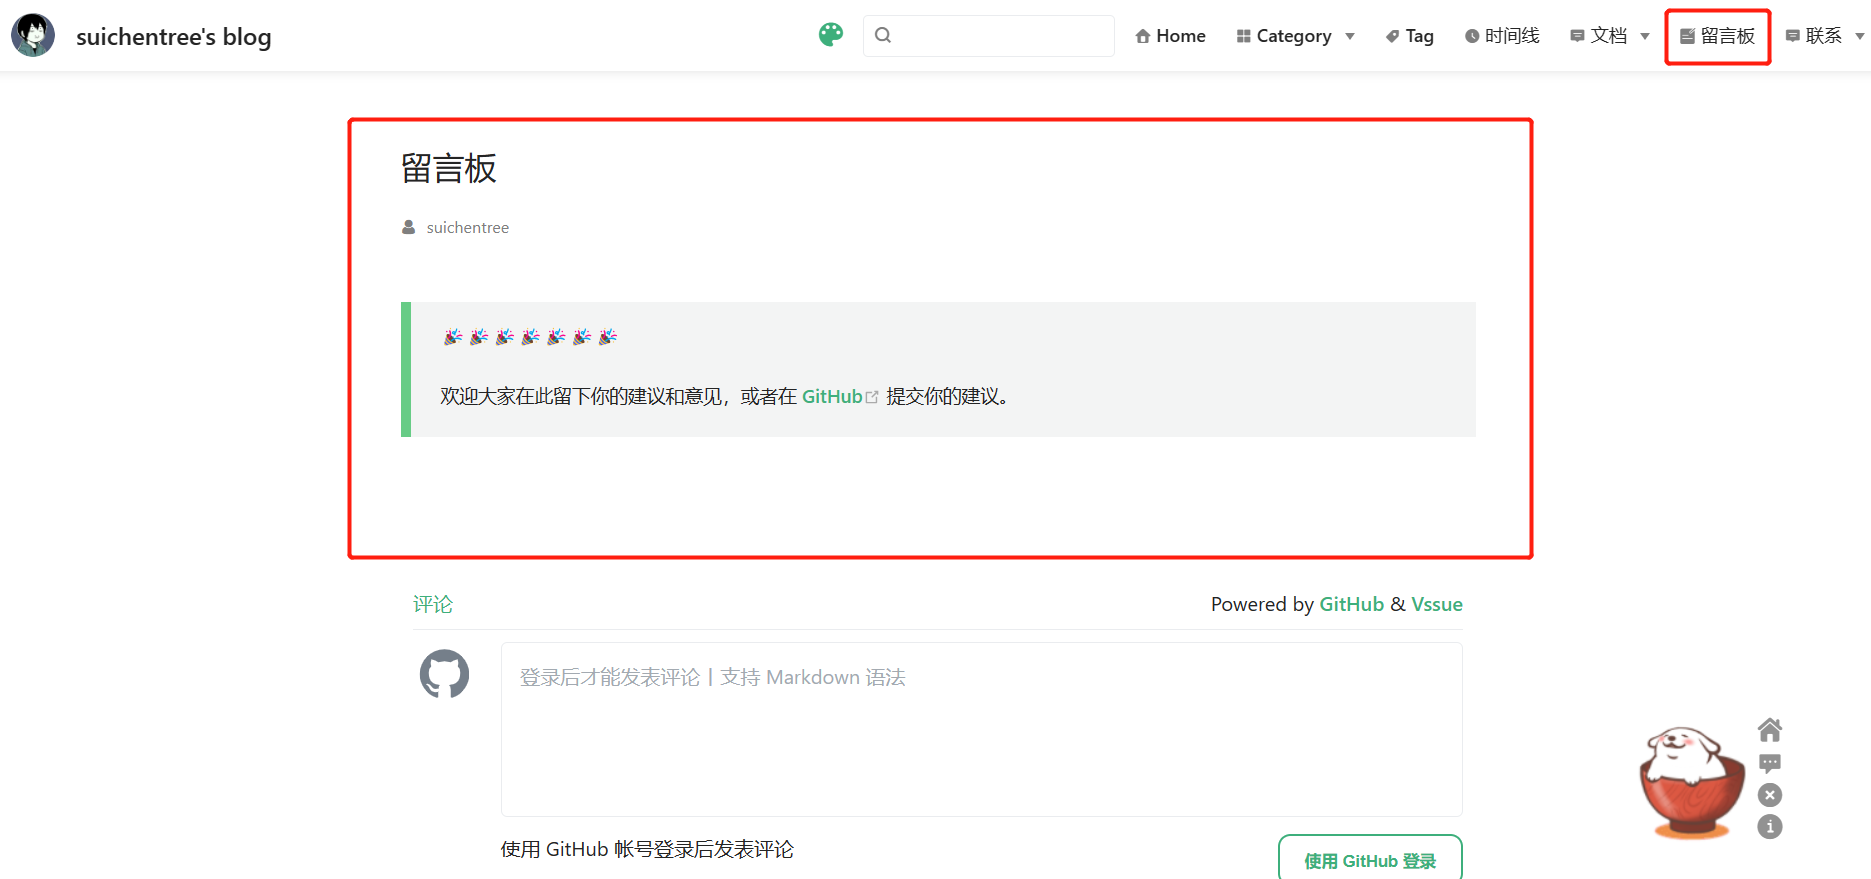
实现方式
- 在当前工程的blogs目录创建留言板目录。在留言板目录中创建messageBoard.md文件
messageBoard.md文件内容如下
---
title: '留言板'
date: 2023-08-09
isShowComments: true
---

::: tip
🎉🎉🎉🎉🎉🎉🎉

欢迎大家在此留下你的建议和意见,或者在 [GitHub](https://github.com/suichentree/suichentree.github.io) 提交你的留言。

🎉🎉🎉🎉🎉🎉🎉
:::
2
3
4
5
6
7
8
9
10
11
12
13
14
- 在工程的config.js中添加留言板配置。
//config.js
module.exports = {
  //.......
  "themeConfig": {
    //头部导航栏
    "nav": [
      //留言板配置
      {
        "text": "留言板",
        "link": "/blogs/留言板/messageBoard.html",
        "icon": "reco-suggestion",
      }
    ]
  }
}
2
3
4
5
6
7
8
9
10
11
12
13
14
15
16
- 重新运行工程。
# 博客添加百度统计
给博客添加访问统计功能,使用百度统计工具。
实现方式
访问百度统计网站,登录自己的百度账户。百度统计 (opens new window)
使用设置-》新增网站
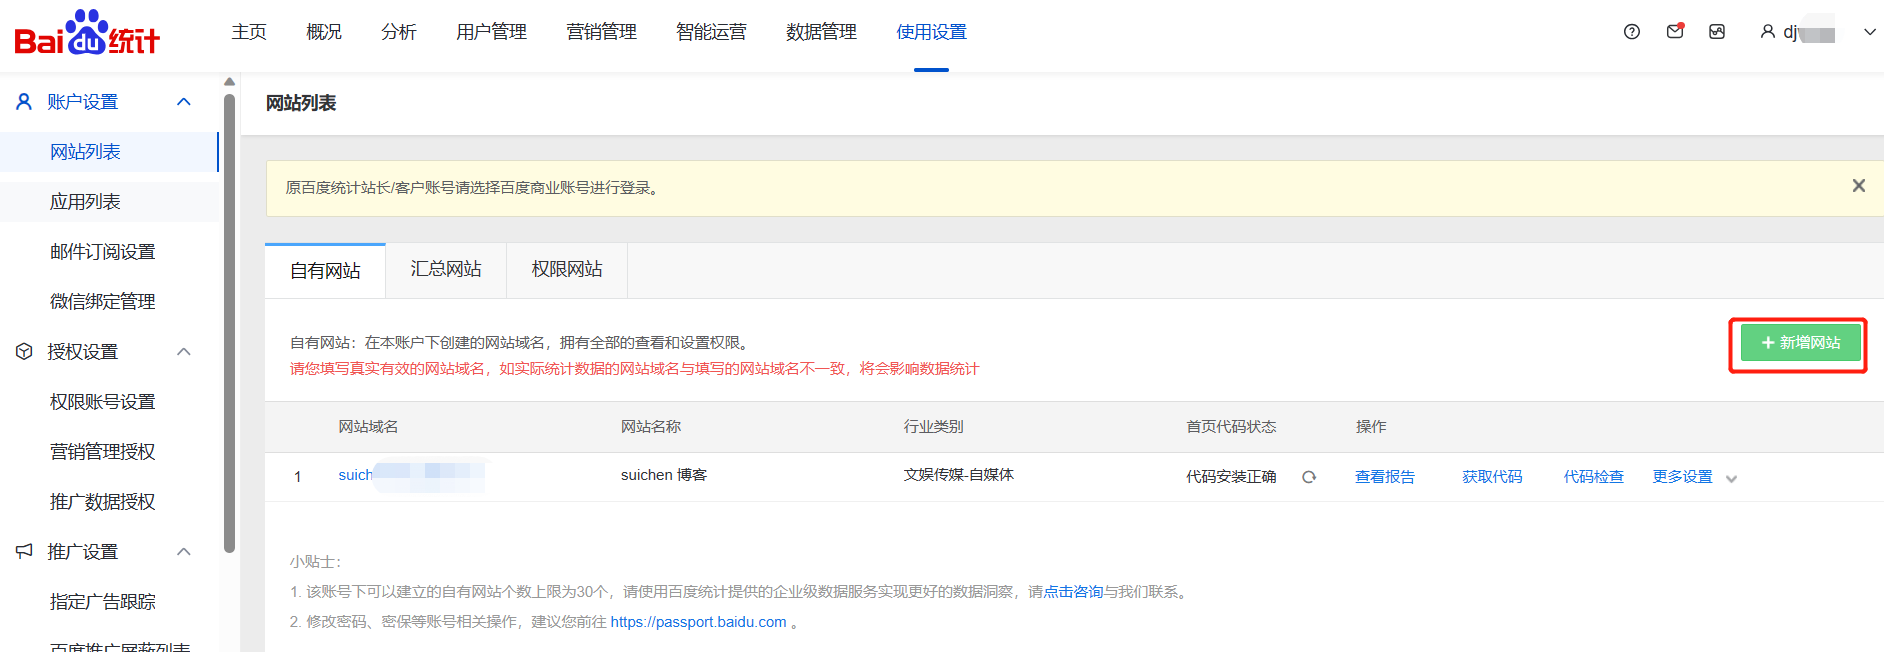
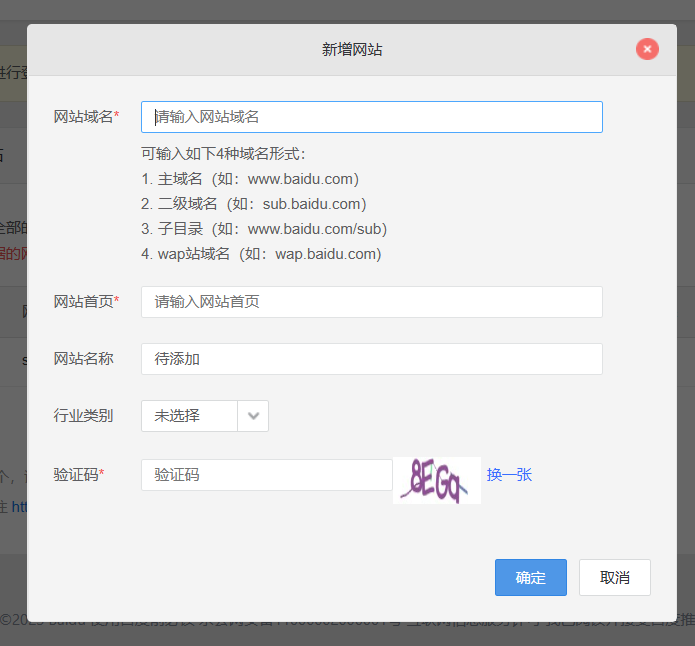
- 域名:填写博客的域名。例如
suichentree.github.io - 首页:填写博客首页的网址。例如
https://suichentree.github.io
- 新增网址后,找到访问统计代码。
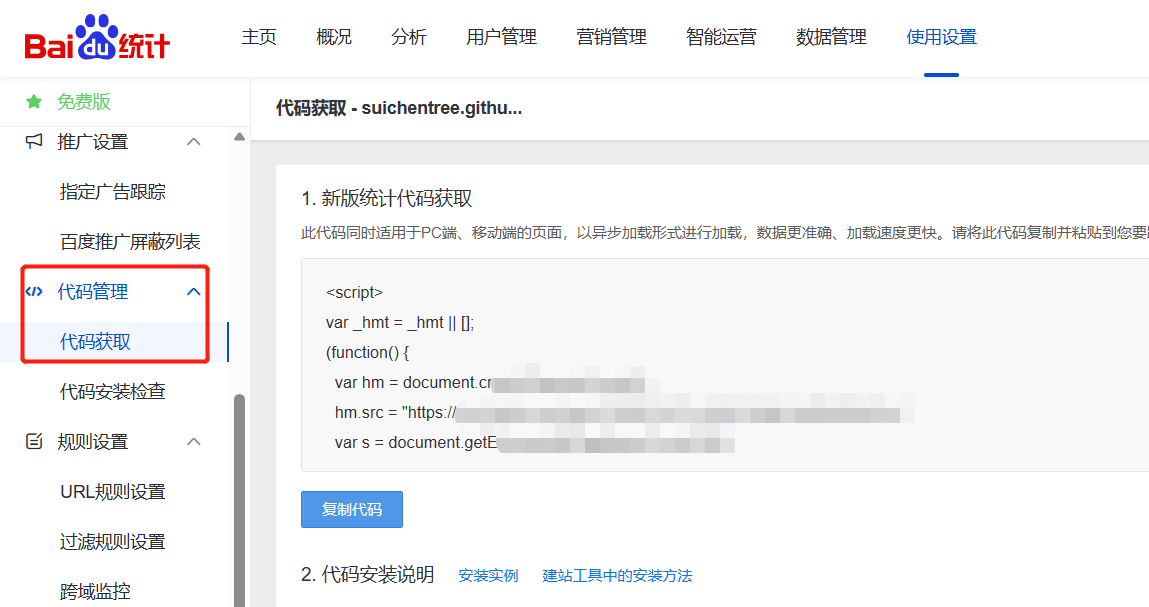
- 在工程的config.js中添加这段代码。
module.exports = {
    head: [
      [
        'script', {}, `
        var _hmt = _hmt || [];
        (function() {
          var hm = document.createElement("script");
          hm.src = "https://hm.baidu.com/hm.js?xxxxxxxxxxxxxxxxxxx";
          var s = document.getElementsByTagName("script")[0];
          s.parentNode.insertBefore(hm, s);
        })();
        </script>
        `
      ]
    ]
}
2
3
4
5
6
7
8
9
10
11
12
13
14
15
16
- 本地验证
本地运行前端工程,访问页面。在F12控制台的网络页面查看请求。
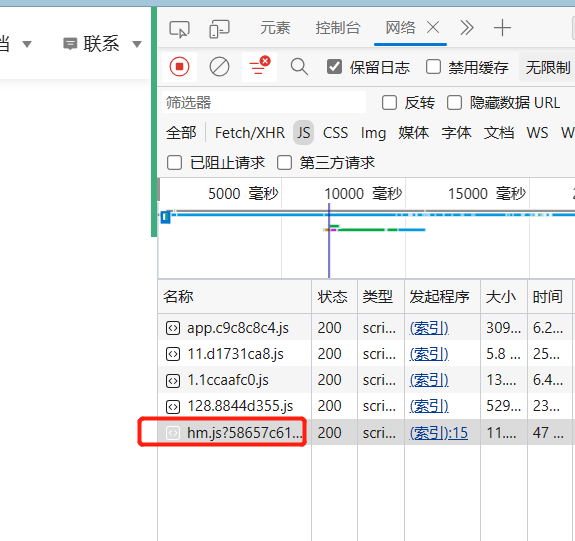
若成功请求了hm.js和hm.gif ,表明验证成功。
- 线上验证
将最新的博客代码提交到github上,部署完成后。在代码检查处,点击开始检查按钮。进行线上验证。
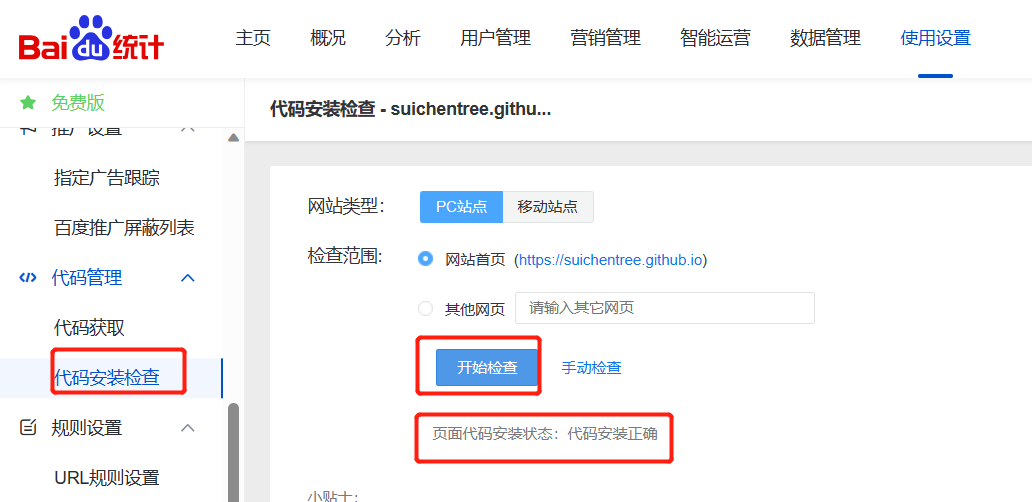
注意:如果你当前的上网状态是科学上网,那么代码检查可能失败。需要恢复到原来的上网状态,再重新进行代码检查。
- 如果检查成功,一般20分钟后,就可以看到博客的访问统计数据了。
# 单页面应用的访问统计问题
通过在 head 中引入百度统计代码,如果是普通的页面,没有什么问题,但是 VuePress 搭建的是一个单页应用,页面切换过程中,不会重新加载页面,自然也不会触发百度统计。所以只能统计到用户访问了页面,但具体点开了哪些文章,跳转了哪些路由并不知道。为了实现路由切换时的数据统计,我们还需要监听路由改变,手动上报数据,那具体我们该怎么做呢?
实现方式
- 在.vuepress 目录下新建一个 enhanceApp.js 文件。
enhanceApp.js文件中加入如下代码。
export default ({ router }) => {
    router.beforeEach((to, from, next) => {
      if (typeof _hmt !== "undefined") {
        if (to.path) {
          _hmt.push(["_trackPageview", to.fullPath]);
        }
      }
      next();
    });
  };
2
3
4
5
6
7
8
9
10
- 重新提交代码到github仓库中。
- 访问博客页面,进入到其他文章中。现在进入到其他文章页面中,也会触发百度统计功能。
